
")
Posted by Dariia Dantseva on 20th Apr 2026
How to Do CRISPR at Home: Beginner's Complete Guide (2026)
Five years ago, if you told a molecular biologist you were going to do CRISPR gene editing in your kitchen, they would have laughed at you.
Today, people are doing exactly that - on their dining tables, in their garages, in dorm rooms and home offices. Not professional scientists. Not people with PhDs. Regular, curious people who decided they wanted to understand one of the most important technologies in human history by actually using it.
This is a complete guide to doing CRISPR at home. We'll cover what CRISPR actually is (without the textbook jargon), exactly what you need to get started, and a step-by-step walkthrough of your first real experiment - the same one that ships in The ODIN's CRISPR Bacteria Gene Editing Kit.
No prior biology experience required. Seriously.
What Is CRISPR, Actually?
CRISPR stands for Clustered Regularly Interspaced Short Palindromic Repeats, which is a mouthful that means almost nothing to anyone who isn't already a molecular biologist. So forget the acronym. Here's what CRISPR actually does.
Inside every living cell is a genome - the full instruction manual for that organism, written in DNA. For decades, editing that instruction manual was painstaking, expensive, and largely limited to well-funded research institutions. You needed years of training, millions of dollars in equipment, and a lot of luck.
Then, in 2012, researchers Jennifer Doudna and Emmanuelle Charpentier figured out how to repurpose a bacterial immune system into a programmable gene editing tool. They won the Nobel Prize in Chemistry for it in 2020. What they discovered was essentially this: you can take a protein called Cas9 - which acts like a pair of molecular scissors - and attach it to a short piece of RNA that acts like a GPS address. You tell the scissors exactly where in the genome to go. They go there. They cut.
That cut can be used to knock out a gene entirely, or to insert new genetic material at a precise location. It works in bacteria, yeast, plants, mice, and human cells. It's the most precise, versatile, and affordable gene editing tool ever developed, and it's now accessible enough to use at home.
When you do a CRISPR experiment with an ODIN kit, you're using real Cas9 protein and real guide RNA - the same components used in university labs and pharmaceutical research. The difference is the organism. You're editing bacteria, not human cells. And that makes all the difference when it comes to doing this safely and legally at your kitchen counter.
What Do You Actually Need?
Here's the myth worth busting first: you do not need a full biology laboratory to do CRISPR. What you actually need is:
The CRISPR kit itself. The ODIN's CRISPR Bacteria Gene Editing Kit ships with everything: the Cas9 protein, the guide RNA, template DNA, non-pathogenic E. coli bacteria (the DH5α strain, which is the genetic engineering equivalent of a golden retriever - harmless and easy to work with), agar plates, and all the reagents you need for the experiment. The kit starts at $59 for the basic version. Everything arrives freeze-dried, so it's stable at room temperature and doesn't require overnight shipping.
A simple incubator or warm water bath. The bacteria need to grow at 37°C (body temperature). A styrofoam cooler with a jar of warm water works in a pinch. A dedicated mini-incubator is better if you plan to do this more than once - you can easily make a DIY one or just get a heated matt for used for seeds.
Basic sterile technique. This sounds intimidating but it just means: wash your hands, work on a clean surface, and don't sneeze on your petri dishes. That's genuinely most of it.
Time and patience. The actual hands-on work takes a few hours spread over two days. Most of that time is waiting for bacteria to grow. The manipulation steps themselves are quick.
That's the complete list. No lab coat required, though if you own one, obviously wear it because it looks cool.
Your First CRISPR Experiment, Step by Step
The experiment in The ODIN's CRISPR kit is elegant in what it teaches. You're going to use CRISPR to edit a specific gene in E. coli bacteria - the rpsL gene - in a way that makes the bacteria resistant to an antibiotic called streptomycin. Without the edit, the bacteria die on streptomycin plates. With a successful CRISPR edit, they survive. Your petri dish becomes the readout: colonies growing where nothing should grow.
Here's how you do it.
Step 1: Prepare your materials
Take your kit components out and let any frozen materials reach room temperature. If you're rehydrating freeze-dried bacteria, follow the instructions in your kit — typically just adding a small amount of sterile water and letting it sit for a few minutes. Label your tubes and plates before you start. Future you will be grateful.
Wipe your work surface down with isopropyl alcohol. This isn't about being paranoid - contamination from environmental bacteria is the most common reason beginner experiments fail, and it's completely preventable.
Step 2: Prepare competent cells
Before you can edit the bacteria's genome, you need to make the cells "competent" - temporarily permeable so they can take in external DNA. The kit includes a CaCl₂ (calcium chloride) solution that does this chemically.
Mix your E. coli with the CaCl₂ solution in a microcentrifuge tube and let it sit on ice for about 30 minutes. The cold temperature helps make the cell membranes more receptive. This is the kind of step that sounds complicated written down but takes about two minutes of actual hands-on work.
Step 3: Add the CRISPR components
Here's where it gets real. You're going to add the Cas9 protein, the guide RNA, and the template DNA to your competent cells. These three components are the complete CRISPR editing system. The guide RNA tells the Cas9 exactly which gene to cut. The template DNA provides the new sequence you want to insert.
Add each component to your cell mixture as directed in the kit protocol. Mix gently - don't vortex or pipette aggressively. Treat the cells with some care here; they're doing a lot.
Step 4: Heat shock
This is the step that actually gets the CRISPR machinery inside the bacteria. You're going to briefly expose your cells to 42°C heat - exactly 42 degrees, not 40, not 45 - for about 90 seconds, then immediately plunge them back into ice for two minutes. The rapid temperature change creates a pressure differential that drives the DNA into the cells.
A water bath set to 42°C is ideal. If you're improvising, a cup of water and a thermometer works fine. The timing matters here, so set a timer.
Step 5: Recovery and plating
After heat shock, add a small amount of liquid growth media (recovery broth, included in your kit) and let the bacteria recover at 37°C for about an hour. They've just been through something stressful and need time to start expressing the new genetic material you introduced.
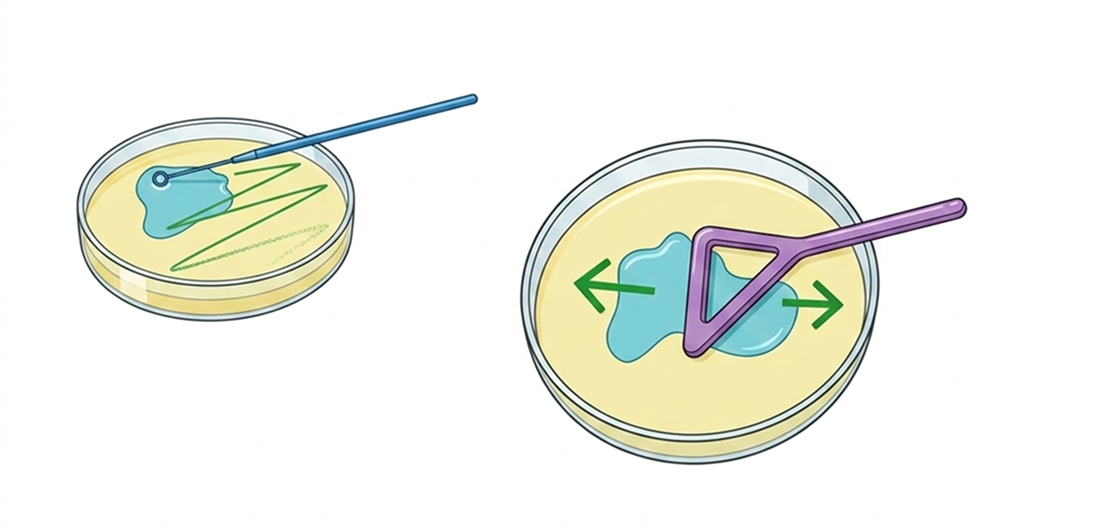
After recovery, use a sterile inoculating loop to spread your bacteria onto two types of plates: regular LB agar plates as a control, and LB agar plates containing streptomycin as your experimental condition. The second plate is where the magic either happens or doesn't.
Step 6: Incubate overnight
Place your plates upside-down in your incubator at 37°C and leave them for 16-24 hours. This is the hardest step, because there's nothing to do but wait and wonder.

Step 7: Read your results
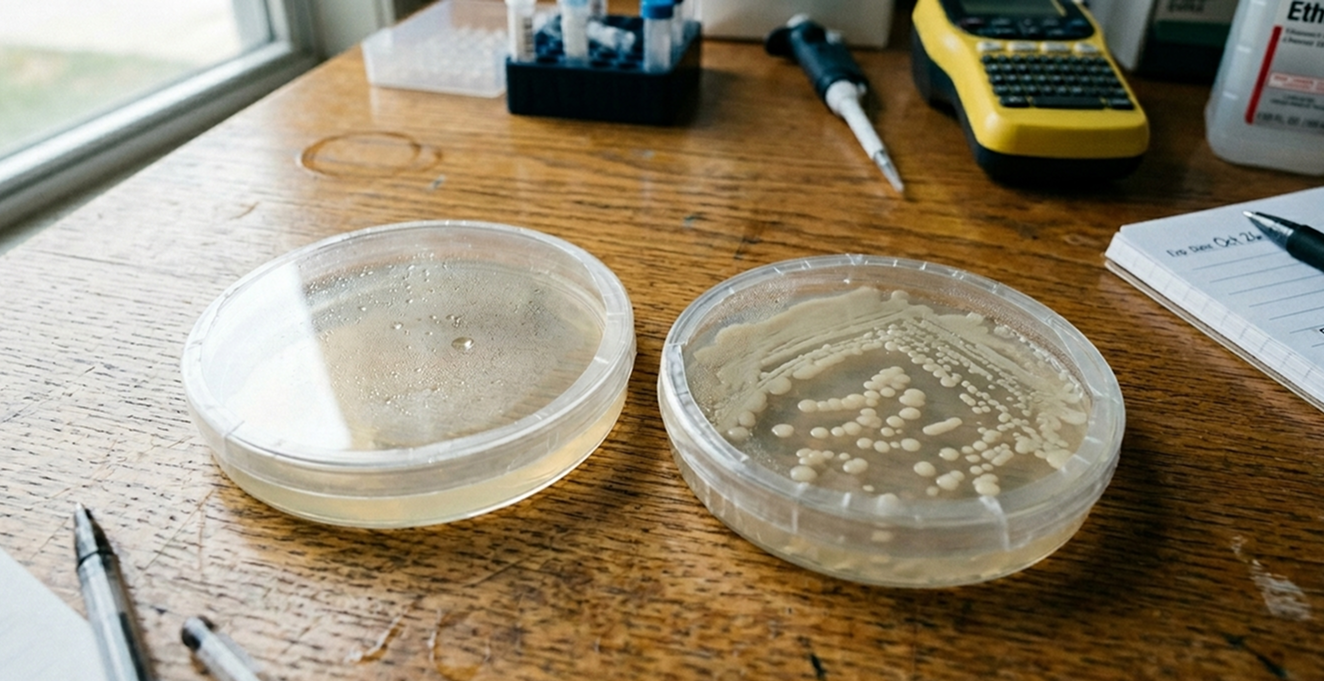
When you open your incubator the next morning, look at your streptomycin plates. If the CRISPR edit worked, you will see colonies - small, opaque dots of bacteria - growing on the antibiotic plate. Bacteria without the edit will be dead. Bacteria with the successful rpsL mutation will be thriving.
Seeing those colonies for the first time is a genuinely strange and exciting feeling. You made an organism that didn't exist before. You changed DNA. You did CRISPR.
When It Doesn't Work: Common Problems and Fixes
Let's be honest: your first experiment might not produce perfect results. That's normal. That's science. Here's what commonly goes wrong and how to fix it.
No colonies on the streptomycin plate. Most likely cause: the heat shock temperature was off, or the recovery time was too short. Check your thermometer calibration and try again with a longer recovery period (90 minutes instead of 60).
Colonies everywhere, including your control plates. This usually means contamination. Your work surface, pipette tips, or plates weren't clean enough. Repeat with more rigorous sterile technique - wipe everything down, use fresh pipette tips for every step, and don't talk or cough directly over open tubes.
The bacteria didn't grow at all. Check that your incubator is actually at 37°C. If you're using a water bath setup, temperature drift is common overnight. Also check that you rehydrated the freeze-dried bacteria properly.
Failed experiments aren't wasted experiments. They teach you what the variables are. Most people who order a refill kit after their first one aren't because it was a disaster - it's because they want to do it again.
What Comes After Your First CRISPR Experiment?
The bacteria CRISPR experiment is the first word in a language that goes much further.
From here, the natural next steps are:
Bioengineering 101 Lab Kit & Course. Dr. Zayner built this specifically for people who caught the bug from their first experiment and want a structured curriculum. It covers transformation, gene expression, protein engineering, and more - with video lectures and hands-on experiments throughout. It's the closest thing to a university bioengineering course you can do at home, at a fraction of the cost.
Plant Genetic Engineering. The Plant Pigment Kit uses Agrobacterium to introduce new genes into tobacco plants. It's a completely different system from bacteria and teaches you principles that are directly relevant to how GMO crops are made.
Human Cell Culture. Growing and working with human cell lines is a significant step up in complexity, but The ODIN sells the equipment, reagents, and guidance to do it. If you want to understand tissue engineering, cancer biology, or gene therapy research, this is where that education starts.
The Complete Genetic Engineering Lab Kit. If you're serious about building a home lab, this bundles a PCR machine, gel electrophoresis system, and all the consumables into one setup. It's what a serious biohacker's bench looks like.
The CRISPR bacteria experiment teaches you the core logic of molecular biology: that DNA is code, that code can be edited, and that the edited code produces different outputs in living systems. Once you understand that in your hands rather than just in your head, everything else builds on it.
Ready to Start?
The CRISPR Bacteria Gene Editing Kit is $59 for the basic kit and ships in 2–3 days within the US. No overnight shipping required. Everything you need is inside.
If you want to go deeper from the start, the Bioengineering 101 Lab Kit & Course includes the CRISPR experiment as part of a full curriculum.
Not sure where to begin? Take a look at our guide to getting started or email us at odin@the-odin.com - we actually read and respond to these.
The bacteria are ready when you are.
Have questions about the experiment or want to share your results? Tag us on Instagram @theodininc or drop a comment below.