

Introduction
Genetic engineering involves modifying an organism’s DNA to deliberately change a characteristic of the organism for a particular purpose. This kit demonstrates the power of the CRISPR Cas9 system by modifying the genomic DNA of a strain of E. coli so that it can grow and survive in conditions it normally would not be able to.
This kit requires ~10 hours of work over the course of at least 2 days. It can be completed on a weekend if fresh bacterial cultures are prepared on a Friday night.
As this document is constantly being updated with tips and pointers and there are video links embedded, you can find the most up-to-date version online at:https://tinyurl.com/CRISPRDIY
What is CRISPR Cas9 doing in this experiment?
Bacteria and all other organisms need to make proteins to survive. Proteins are tiny nanomachines that do everything from control our metabolism to keeping our heart beating. In order to make a protein, a cell uses the DNA code. Each 3 sequential letters of DNA codes for a single amino acid; proteins are chains of amino acids.
Cas9 and all other proteins are made by the ribosome, a nucleic acid and protein complex in the cell. The media that you are attempting to grow the bacteria on contains a molecule called streptomycin which binds the ribosome and prevents it from making proteins, stopping the bacteria from replicating and growing. This kit makes a specific mutation in the ribosomal subunit protein rpsL that prevents streptomycin from binding it, allowing the bacteria to grow on the streptomycin media. It changes a single DNA base so that the Lysine amino acid at position 43 (K43) is turned to Threonine.
The genome of the E. coli bacteria that you will engineer is over 4 million DNA bases in size and CRISPR will find the single one that needs to be mutated!
For more information on sequences and details check out our more advanced CRISPR guide here


Kit Contents (pg. 3)
Timeline (pg. 4)
Pipetting (pg. 5)
Making Plates (pg. 6-7)
Making Competent Bacteria (pg. 8-11)
DNA Transformation & CRISPR (pg.12-15)
Successful Experiment Example (pg. 16)
How to Create Your Own gRNA (pg. 17)

Non-perishables
1 - LB Agar
1 - LB Strep/Kan/Arab Agar (Strep (50 µg/ml), Kan (25 µg/ml) and Arabinose (1mM))
1 - 250 mL Glass Bottle for Pouring Plates
1 - 10-100 μL Variable Volume Adjustable Pipette
1 - Box 1-200 μL Pipette Tips
14 - Petri Plates
1 - Microcentrifuge Tube Rack
5 - Inoculation Loops
5 - Pairs of Nitrile Gloves in Plastic Bag
1 - Bag of Microcentrifuge Tubes
5 - 1.5mL Microcentrifuge Tubes containing LB Broth
1 - 50mL Centrifuge Tube for Measuring Liquid Volume
1 - 1 mL Bacterial Transformation Buffer 25mM CaCl2, 20% PEG 8000
Perishables
OK to be shipped at room temperature but should be stored in the fridge upon arrival for longer-term
Cas9 Plasmid Kanr Freeze Dried Tube
gRNA Plasmid Ampr Freeze Dried Tube
Template DNA Freeze Dried Tube
Sequence: ATACTTTACGCAGCGCGGAGTTCGGTTTTGTAGGAGTGGTAGTATATACACGAGTACAT
2 - Non-pathogenic E. coli bacteria Freeze Dried Tube (DH5ɑ)
1 - Sterile Water Tube

Preparation
-
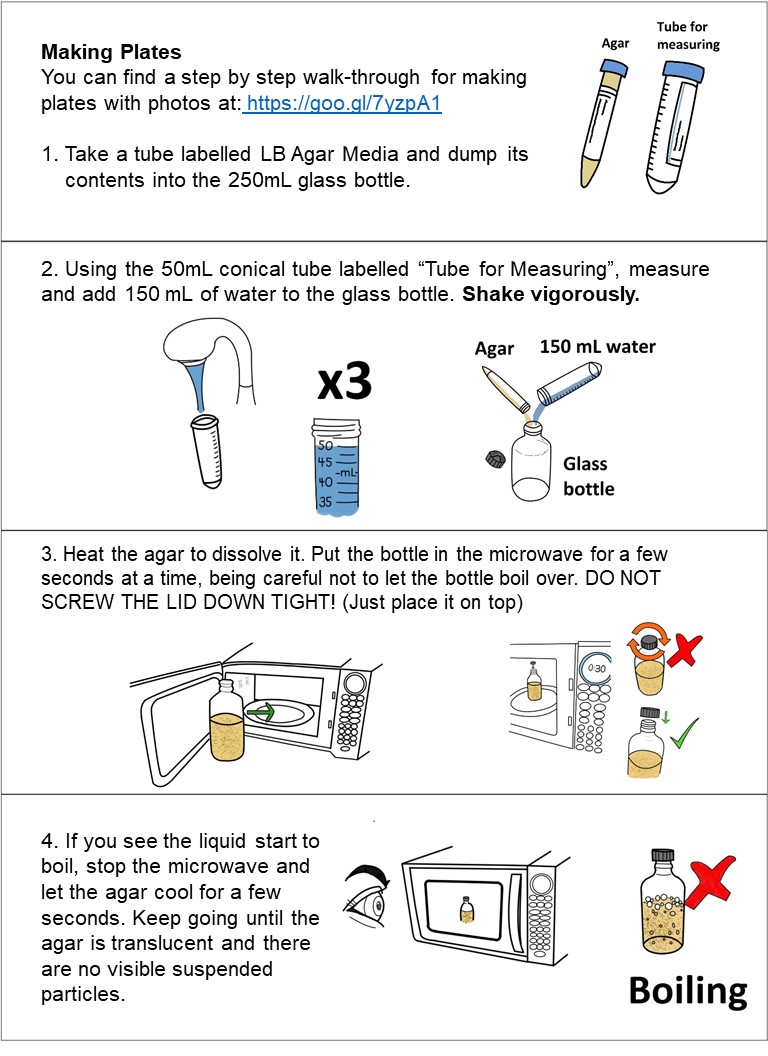
1 hour - Make plates (set aside more time if it's your first time making plates)
-
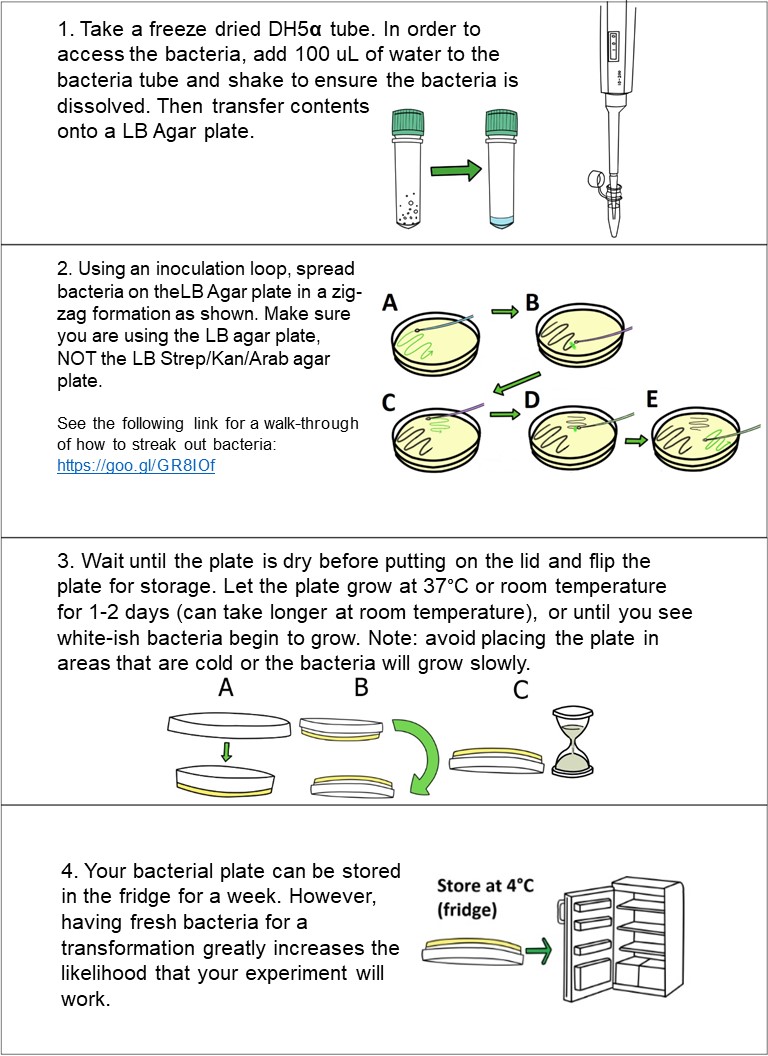
Streak out bacteria onto a LB Agar plate (takes ~1 min)
-
Agar plates provide a solid media nutrient source for bacteria and yeast to grow on. The standard media that is used is LB (short for Luria Broth, Lysogeny Broth, or Luria Bertani Broth). This contains a carbon source, a nitrogen source, and salt (many strains of bacteria like salt!).
-
12-18 hours - Let the bacteria grow (easiest to just let it sit overnight)

Day of experiment
-
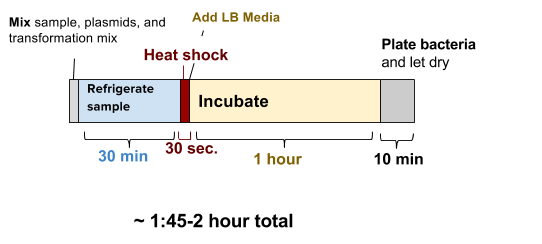
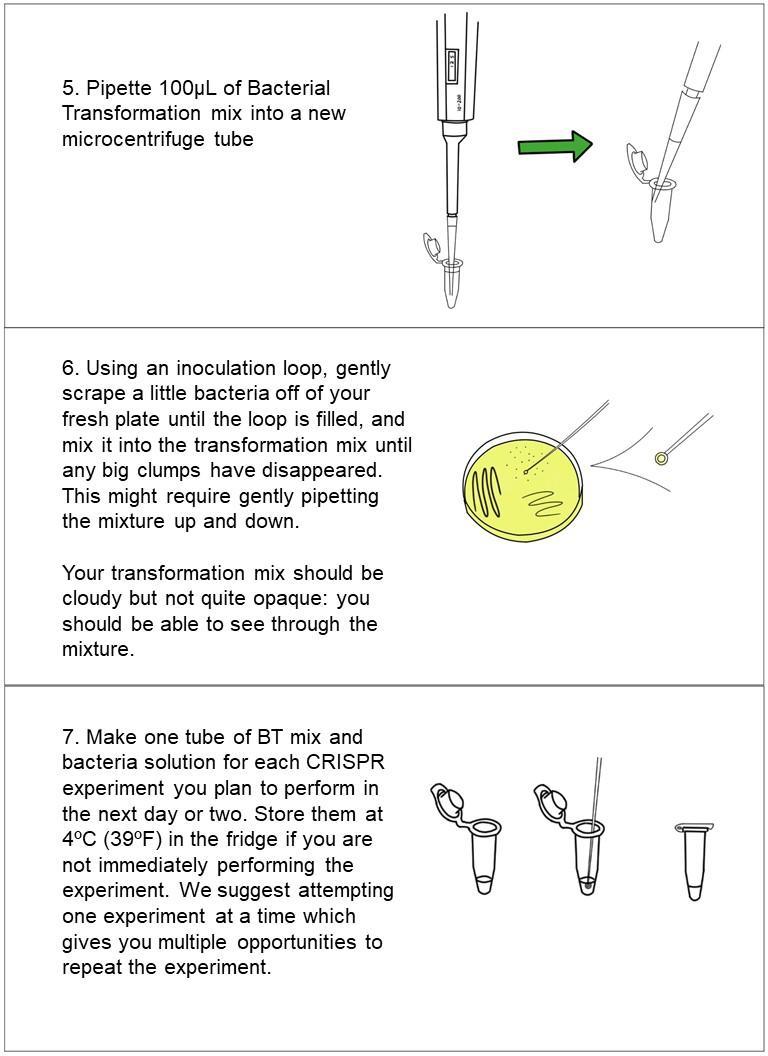
Mix together bacteria, plasmids, and transformation mix (takes ~5 min)
-
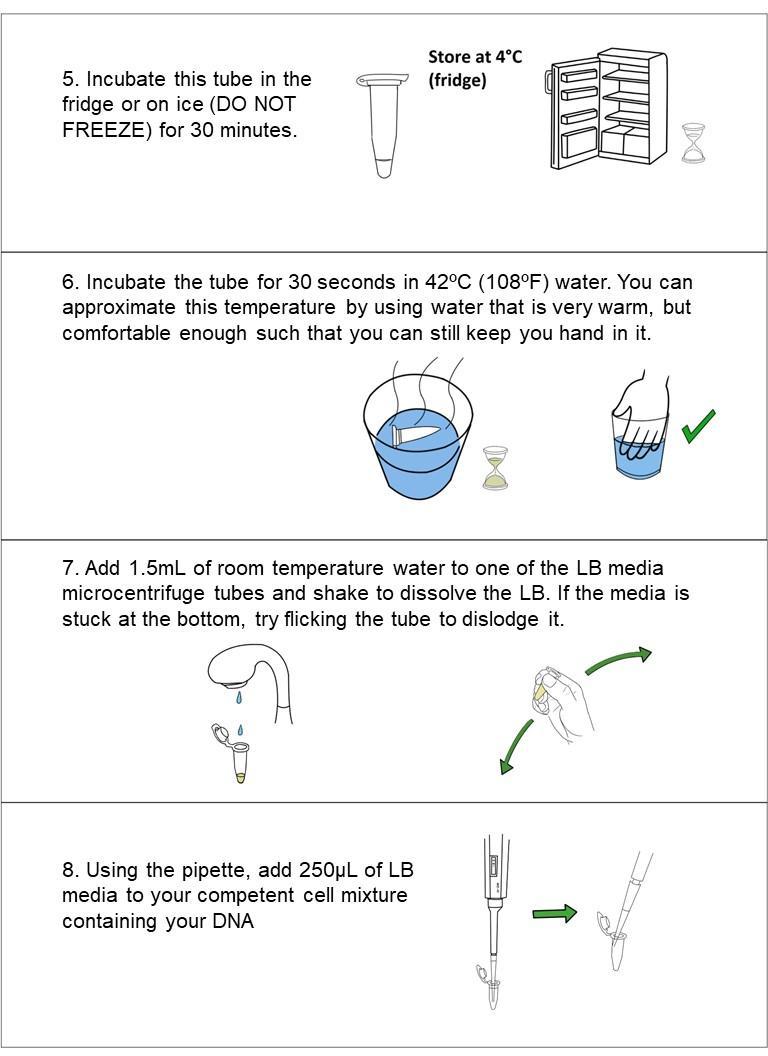
30 min refrigerate sample solution (do NOT freeze)
-
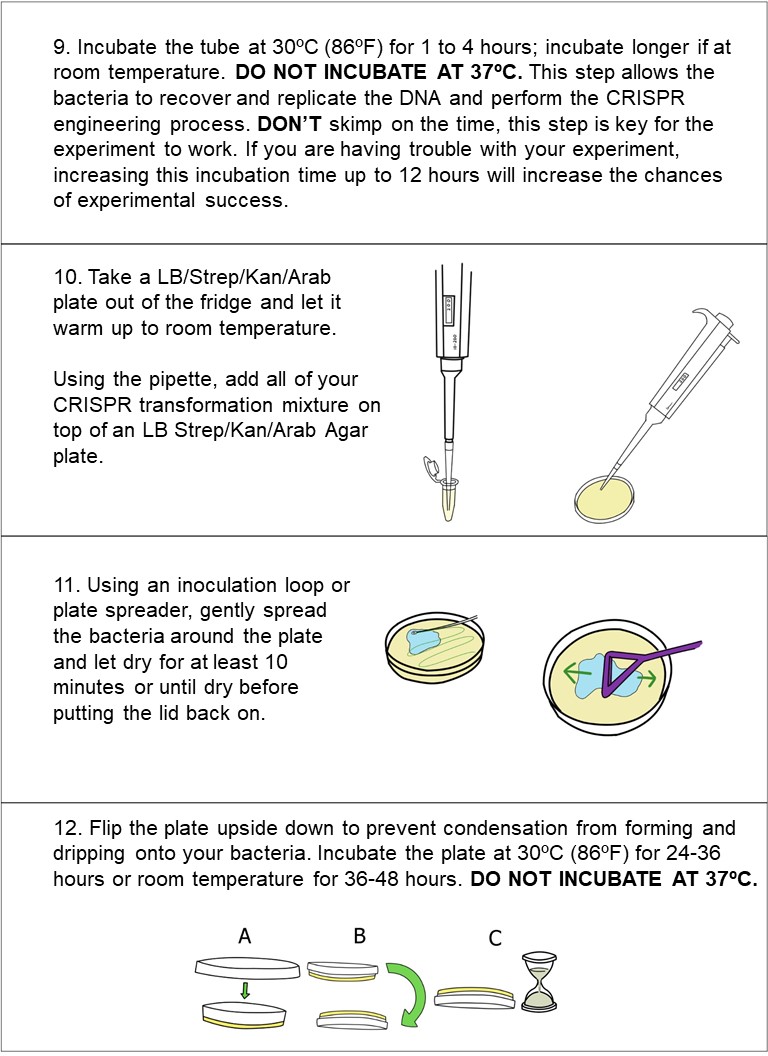
30 seconds‘heat shock’ the sample in warm (42ºC/108ºF) water. Add LB media to your cell solution (takes ~1 min)incubate for at least 1-2 hours at 30ºC, (or if at room temp, incubate for at least 4 hours for best results). Plate 200 μL of the bacteria solution and let dry for 10 minutes.
Incubate and wait for growth
-
~24 hours - Incubate the plate at 30ºC (86ºF) for 16-24 hours or room temperature for 24-48 hours.
STOP AND READ BEFORE YOU PROCEED
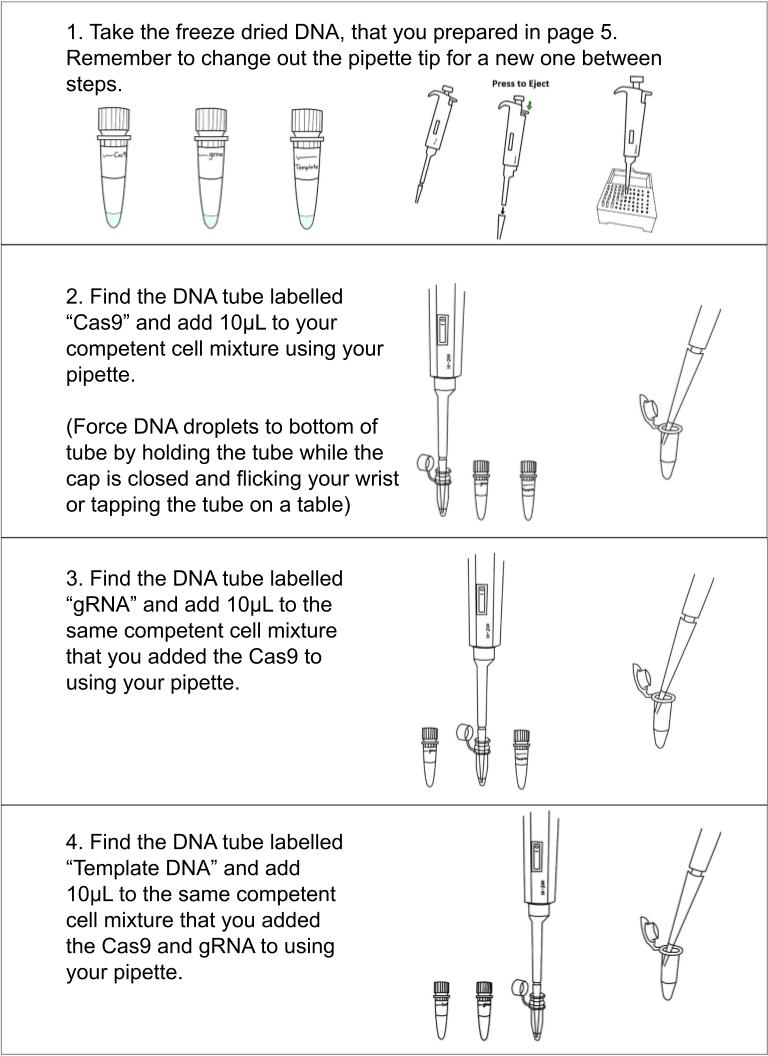
The most common error we see is improper pipette technique! You must read and follow this pipetting tutorial before you start: https://goo.gl/nrA8hT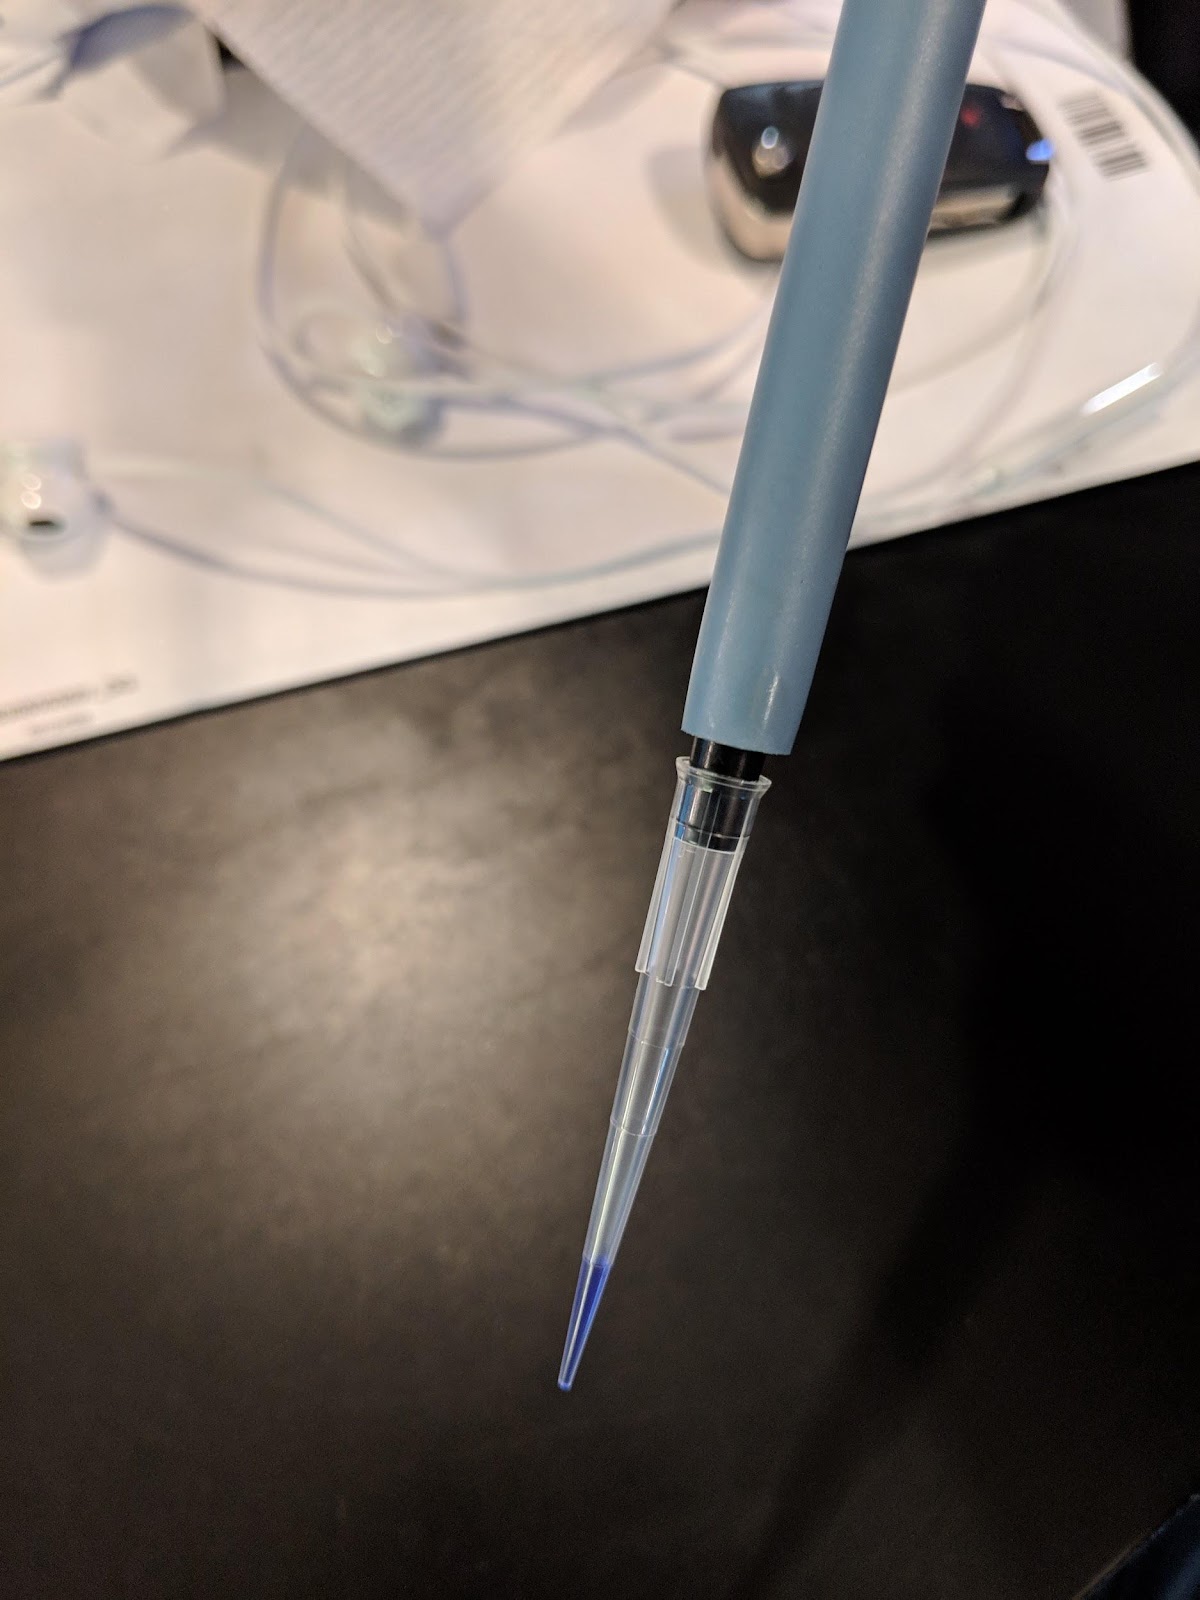
This is 10μL of liquid in a pipette tip. We used a dye to make the liquid easier to see. The liquid should go up to the first demarcation on the tip. Make sure you can accurately draw up 10μL into the pipette before you proceed.
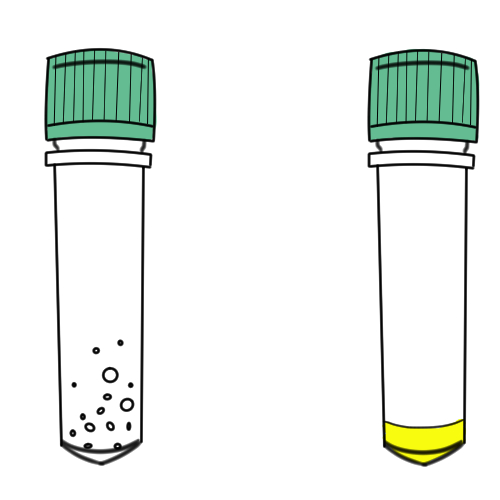
Please check your tubes of DNA labeled “Bacterial rpsL K43T DNA template”, “Bacterial gRNA Plasmid”, and “Bacterial Cas9 Plasmid” . Add 55μL of water from the microcentrifuge tube labeled “Sterile Water” to each DNA tube and shake until you see yellow liquid in the tube. Force the liquid to the bottom of the tube by flicking your wrist with the tube in hand or tapping the tube on a table. If the DNA does not look yellow, take a picture and contact us immediately.
Bacteria in this kit are non-hazardous and non-pathogenic, meaning they cannot cause disease. You can dispose of them by putting 5% bleach on the plate and then putting them in the trash.

Making Competent Bacterial Cells for Transformation
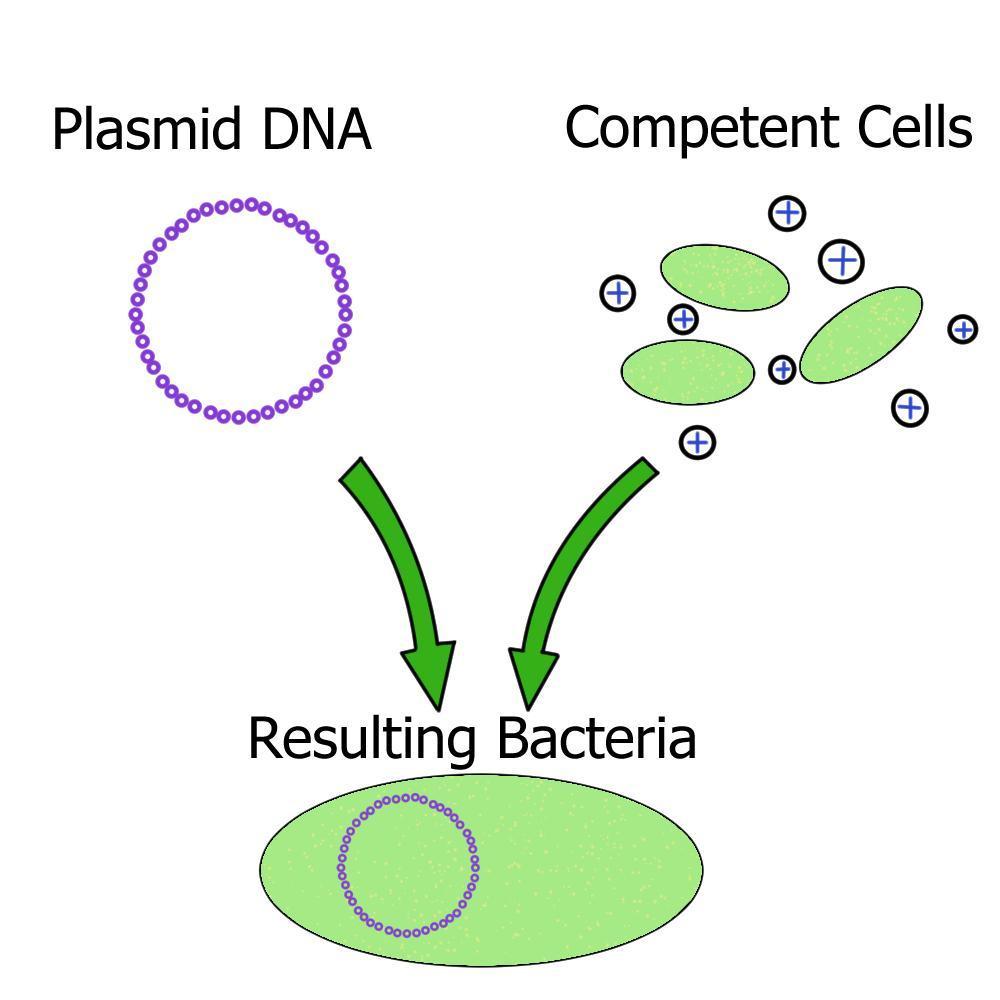
‘Competent’ means the bacteria or yeast cells are able to intake foreign DNA. Cell walls normally prevent things from entering, but mixing the bacteria with chemicals and salts changes this. In order to get CRISPR to work inside the bacteria, we need to get all of the components inside the cells! This process is called ‘transformation.’ We put all the materials into synthetic DNA and then trick the bacteria into thinking that the plasmid DNA is its own DNA and so they make the Cas9 protein and the gRNA.
Making Competent Bacterial Cells for Transformation
The bacterial transformation mix contains:
20% Polyethylene Glycol(PEG) 8000
PEG 8000 is thought to play several different roles in transformation, though nobody really knows for certain. Since both DNA and cell walls are negatively charged, they repel each other. PEG 8000 is thought to function by shielding the negative charge of the DNA, thereby making it easier to permeate the cell wall. PEG 8000 is also thought to help transport the DNA into the cell, as well as make the cell membrane itself more porous.
25mM Calcium Chloride(CaCl2)
Similarly to PEG 8000, CaCl2 is thought to shield and neutralize the negative charge of DNA, thereby making it more likely to enter into the cell.
Non-pathogenic E. coli Bacteria:
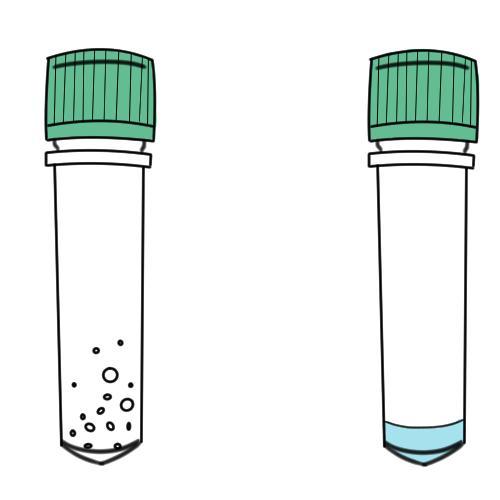
In your DH5α centrifuge tube you should see a substance on the tube walls that indicates freeze dried bacteria. If you are having a hard time seeing the bacteria hold it up to the light.
To prepare the bacteria, add 100 uL of water from the microcentrifuge tube labeled “Sterile Water” to the bacteria tube and shake for 1 minute to ensure the bacteria is dissolved.
Next, take the inoculation loop and gently streak it along a plate per instructions below.

|
Steps of the CRISPR Reaction
|
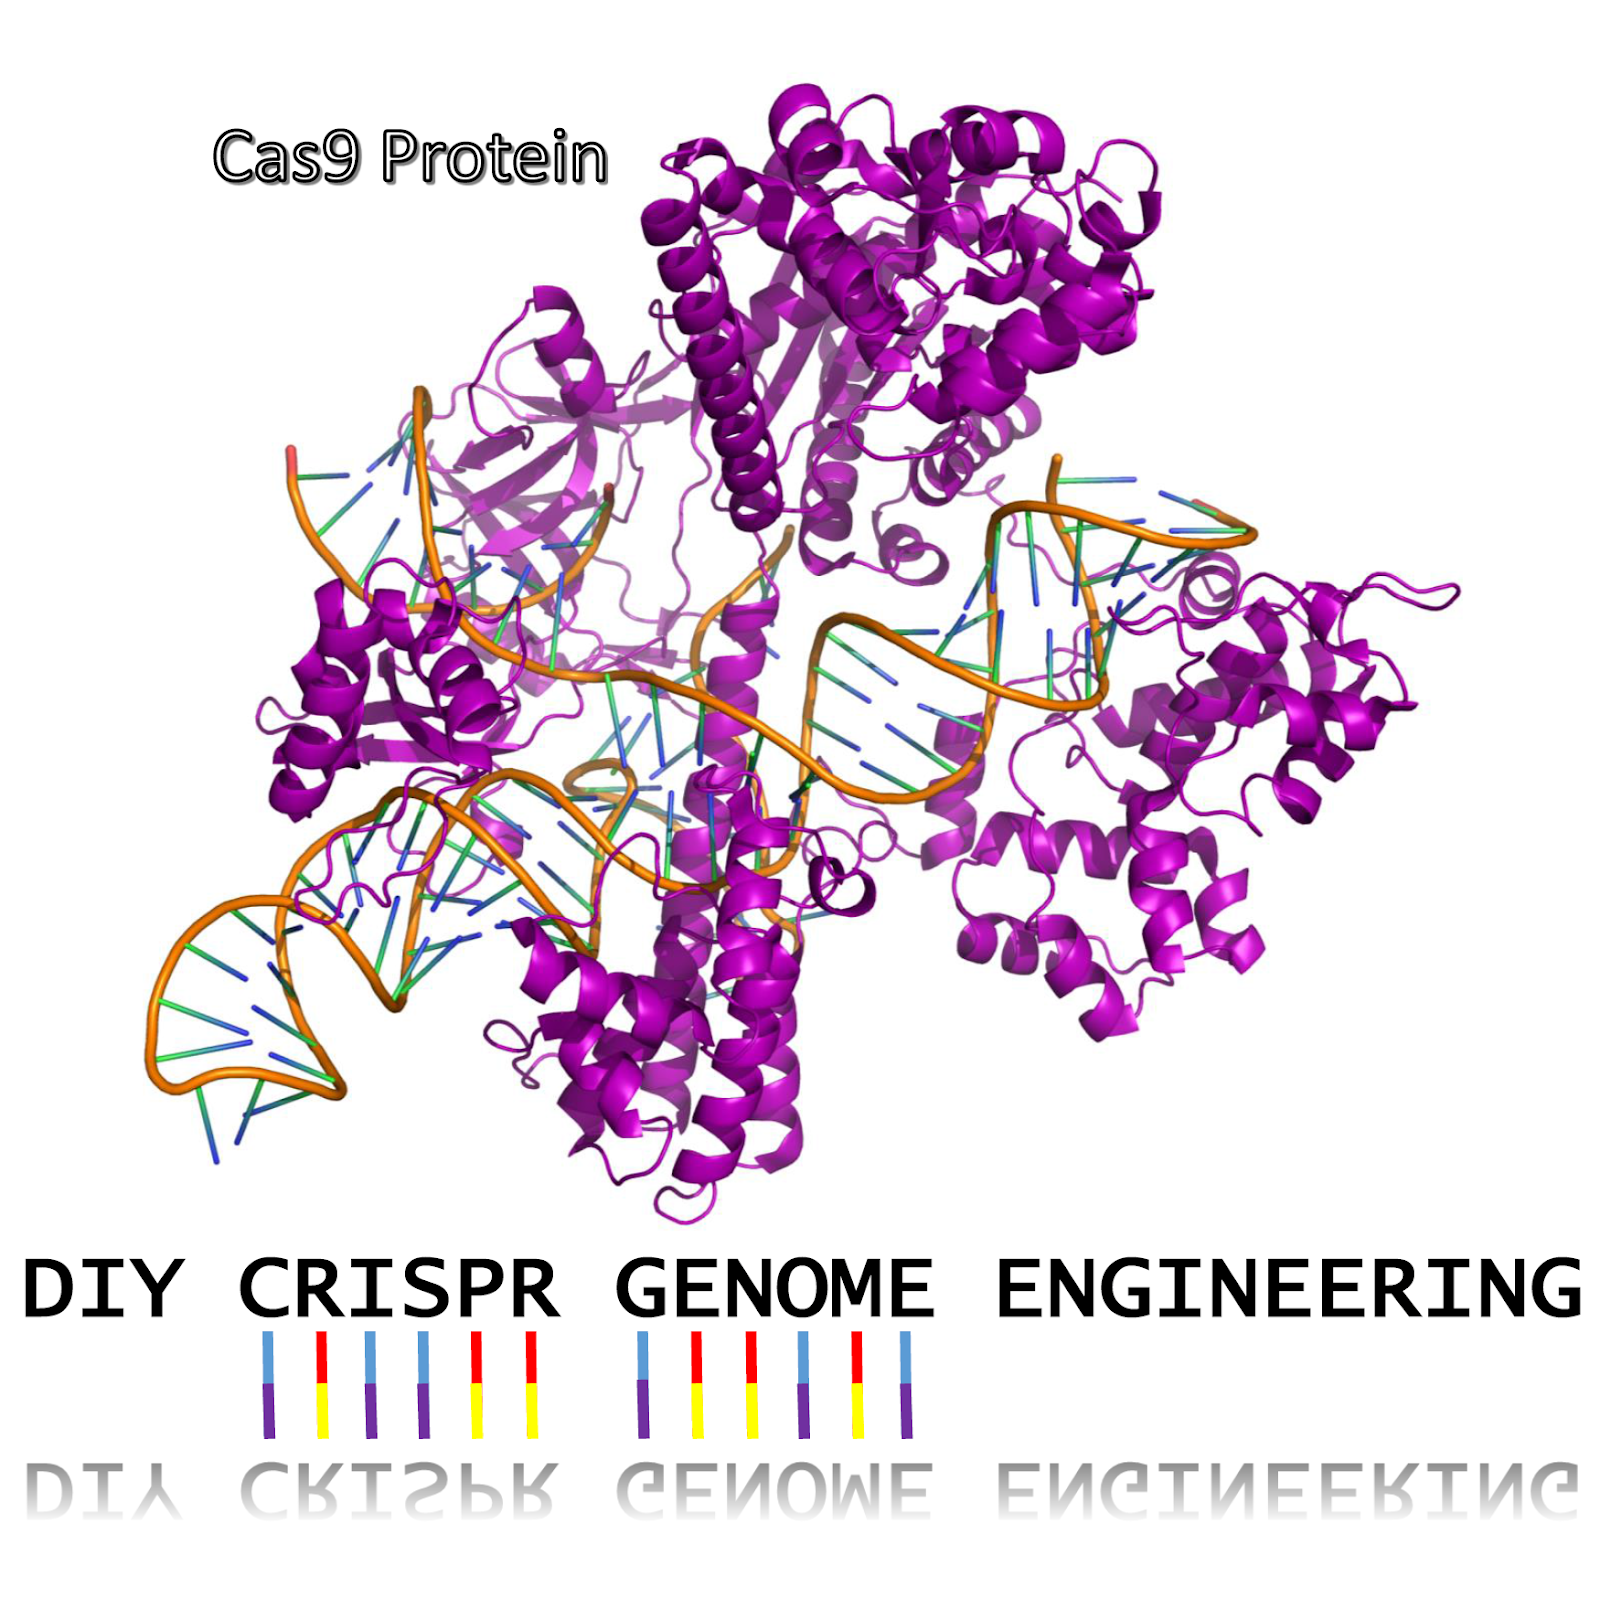
CRISPR has three main parts:
Cas9 Protein
The Cas9 protein is the engine of CRISPR. It binds the gRNA and the gene targeted for editing. If a gene match is found, the Cas9 protein will make a double-stranded cut in the DNA. The cell responds to the cut by trying to repair the DNA damage. Cas9 only cuts, it DOES NOT do any actual gene editing. Instead, it tricks the cell into doing it.
guideRNA (gRNA)
The gRNA is a combination of CRISPR RNA (crRNA) and the trans-activating crRNA (tracrRNA) which are connected by a small nucleotide linker. Some people use the separate tracrRNA and crRNA. In the DIY Bacterial CRISPR kit, we will use a gRNA. The tracrRNA part of the gRNA binds to the Cas9 protein and to the crRNA. Critically, the crRNA part of the gRNA matches (is complementary to) the DNA in the genome that we want to edit. This crRNA match is how the Cas9 protein recognizes where to cut.
Template DNA
Once the Cas9 protein makes a cut on the gene we want to edit, the cell begins to try and repair the DNA through a process called Homologous Recombination. During this process, the cell is looking for a DNA template to repair in the gene that was cut. If we flood the cell with a template that is similar to the missing region, but has a mutation or change in it, the cell will mistake it for a true copy and use it instead. Our template DNA has a single base change from an Adenine (“A”) to Cytosine (“C”). This change causes the DNA to code for a Lysine instead of a Threonine in the ribosome. This change prevents Streptomycin from binding to and disabling the ribosome, which allows the bacteria cell to grow on streptomycin media.
|
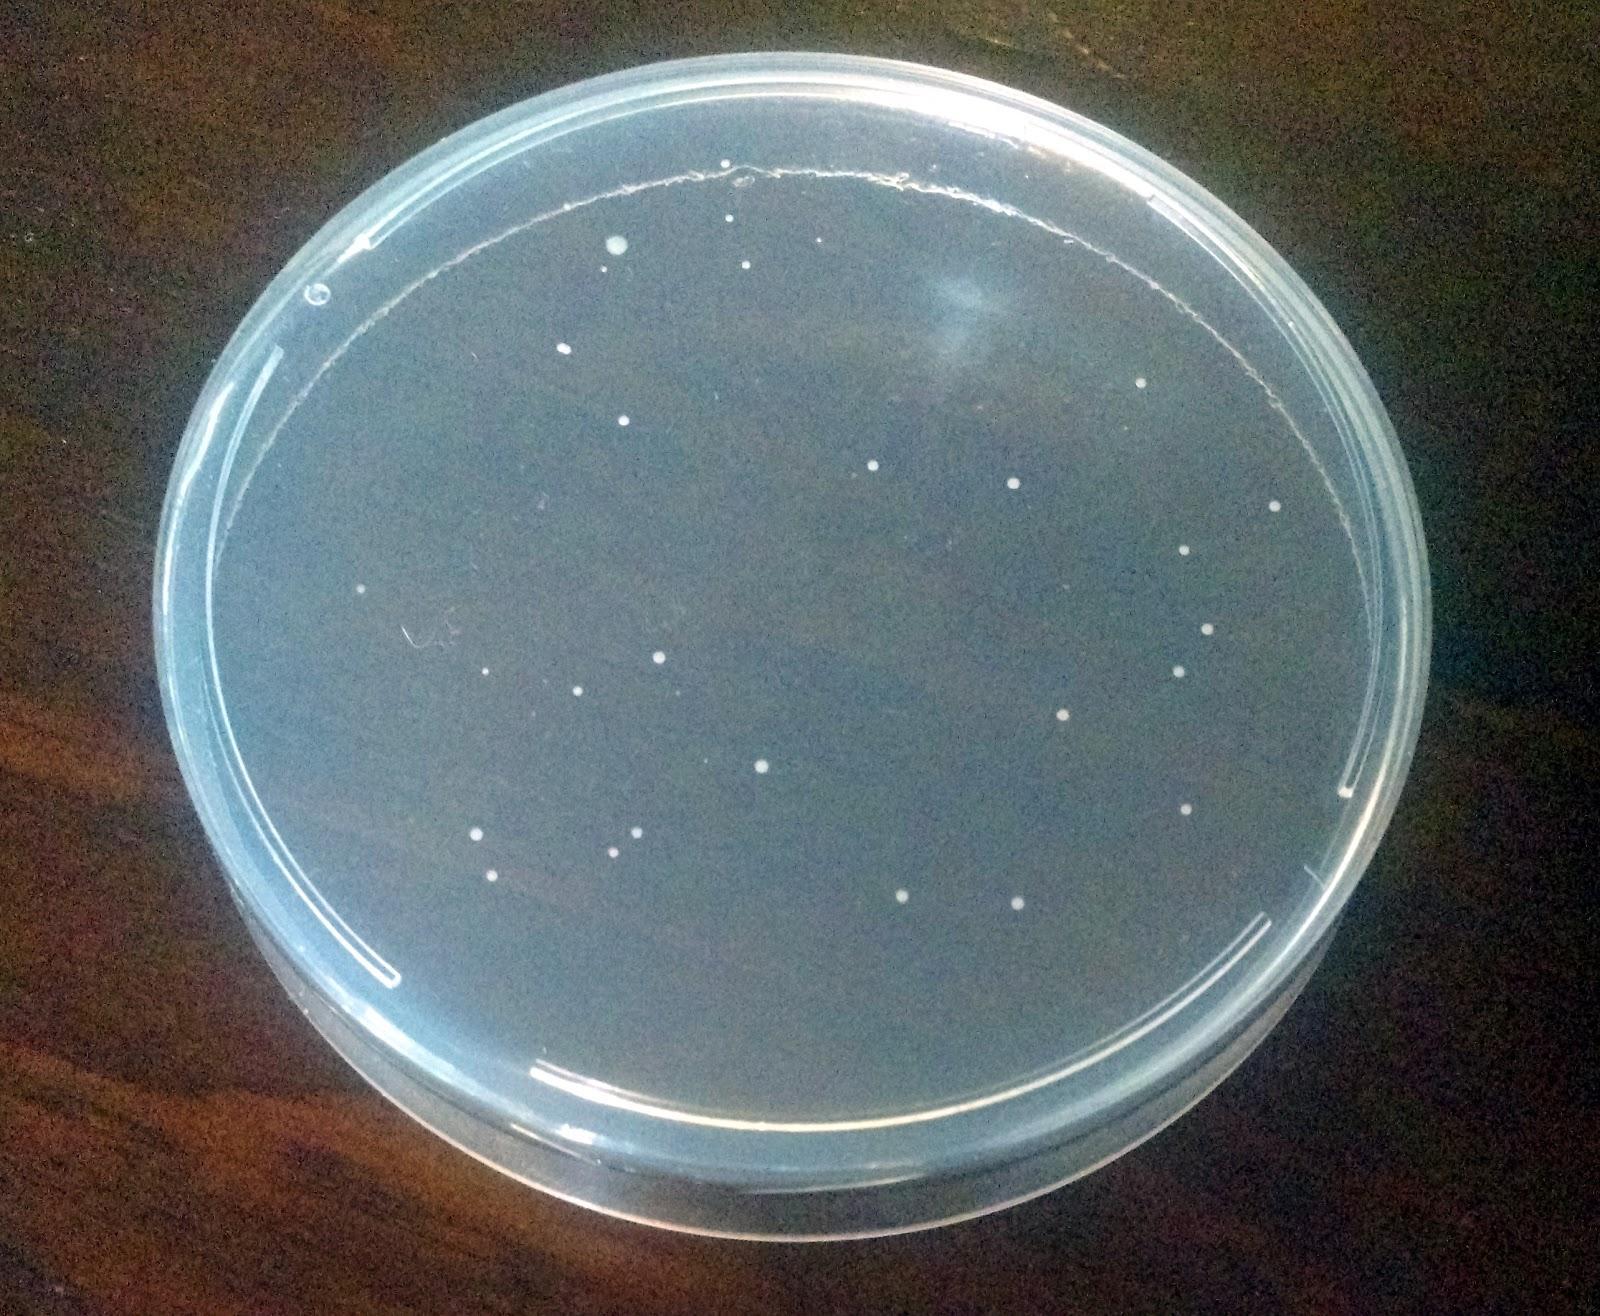
If you begin to see little white round dots growing, then your CRISPR genome engineering experiment was a success! If not, give it another shot. Science doesn’t always work on the first try. Also, feel free to contact us at odin@the-odin.com, and we will help you troubleshoot. Successful experiment example...In a successful experiment you should see whitish or yellowish bacteria growing on the plate as seen in the picture. These are bacterial colonies that were successfully edited and so they survived and replicate to form what scientists call colonies, or small groups of bacteria. |
 How To Create Your Own gRNA
In order to do your own CRISPR experiment, all you need to know is how to design your own gRNA. The gRNA matches the gene that you want to change and tells the Cas9 protein where to cut. The only requirement is that the gene have two guanine(G) nucleotides or two cytosine(C) nucleotides next to each other. This is referred to as the PAM or Protospacer Adjacent Motif and is indicated by the sequence NGG or CCN where “N” means any nucleotide. The lucky thing is you don’t need to do this yourself as there are websites that can choose for you!
-
For In chose E. coli str. K12/MG1655
-
For Target chose rpsL the gene modified in this experiment
-
What you will see is a ranking of gRNAs based on how unique they are (so other places in the genome aren’t accidentally cut) and also other properties that make good gRNA
-
Our gRNA sequence in this experiment is GGAGTTCGGTTTTTTAGGAG. If you search it is ranked #14. So why choose the #14 ranked gRNA? In our case, we chose this gRNA because it is so close to the position in the gene that we want to change the DNA. This increases the likelihood that the template DNA will be inserted into the genome. If you are just trying to knock-out a gene it is best to choose the best gRNA that occurs earliest in the gene. In this case we would probably choose #6 (earliest) or #1 (best and still early).
-
You can use these same methods to design a gRNA for other organisms. Instead of E. coli just enter the organism's name and choose a gene. For instance, myostatin knock-outs in animals make them very muscular. You can find a gRNA that would target the MSTN or myostatin gene in humans.
Check Us Out Online

http://youtube.com/c/TheODINInc

http://facebook.com/TheODINInc