

The search for natural antibiotics in what we see everyday.
This guide can be found at: http://goo.gl/sj4Wvy
This kit allows you to test many different types of samples for their ability to kill bacteria or stop bacterial growth.
Part 1. Testing Plants and Other Organisms that Need to be Ground Up
Part 2. Testing Bacteria and Fungus
14 - Plates
1 - Mortar and Pestle
Cell Spreaders
200 - Filter Paper Test Discs
1mL - Antibacterial Control(Labelled Kan or Kanamycin or Antibiotic)
5 - 15mL Culture Tubes with LB Media
2 - 15ml Tubes with LB AGAR
5 - Empty 15mL Culture Tubes
5 - Pairs of Nitrile Protective Gloves
50mL Buffer
Sterile swabs
Escherichia coli non-pathogenic Bacteria
Inoculating Loops
Tweezers
Dropper Pipettes
Each plate can test ~2 Samples for a total of about 40 samples that can be tested.
A few things to keep in mind when performing experiments
-
The bacteria you are testing cannot harm you but it is very very similar to bacteria that can harm. This makes it a perfect safe substitute to test for antibiotics and learn Science.
-
Attempt to Document your experiments as thoroughly as possible by taking pictures or videos and writing about it. This allows you and other people to replicate the experiment if something interesting is found.
-
If you find leaves or samples on the ground rinse them in water before you test them as they can accumulate chemicals from cars and pollution and many other things.
-
There are many things that can kill bacteria that are not very useful as antibacterial for human consumption such as things with high salinity(lots of salt), things with low pH(very acidic), oils, detergents and soaps. Try and avoid these things.
-
Bacteria and yeast tend to have more antibiotic compounds than plants so make sure you test them out also!
Part 1. Testing Plants
Day 1: Prepping Bacteria, collecting samples and making agar plates
-
Start a culture of bacteria in a 15mL tube. Add water to the 10mL line and shake till media is dissolved, then using an inoculation loop gently scrape bacteria from the plate that is labelled as E. coli and stick it in the liquid. In a pinch you can always use a swab of your skin to grow up bacteria!
-
You need to let the bacteria grow so there is enough for a few tests. Let the tube sit in a warm place with cap slightly unscrewed, to allow oxygen in, for 24-48 hours or until solution starts to become cloudy. The bacteria is non-pathogenic, meaning it cannot cause any disease and is similar to bacteria on your body. And can be cleaned up with soap and washed down the drain.
k
The Yellowish but clear liquid is media with no bacterial growth(Left). The Yellowish and cloudy liquid indicates bacterial growth(Right).
-
While waiting for your bacteria to grow Collect your Sample. When you collect your sample make sure that you collect enough to store for further analysis if the antibacterial assay is a success. Record GPS coordinates and take pictures of the plant or specimens collected for identification and posting on the website(http://www.the-iliad.org)
-
(See more detailed directions [how to make plates]. To make your plates add one tube of the LB agar powder to150mL water(measure with 50mL tube provided) and microwave until dissolved. Let the agar cool down to 50C or until you are able to touch the bottle without too much discomfort. Pour enough LB agar to fill bottom of plate(the bottom is the smaller side of the plate)(each tube should make ~10 plates) and then let cool and solidify. Store plates at 4C in the fridge for later use. Plates will last a few weeks to a few months.
Day 2: Process your Samples
-
Once your bacteria is grown from Step 2 you should proceed to Step 6
-
Place your sample in the mortar, add buffer using the plastic pipette and then grind. The amount of buffer you add should depend on the amount of sample you have(start with a few drops and increase till you have a small liquid slurry). The less sample the less buffer because you want to keep the plant extract concentrated.
-
Take a new pipette and add a few drops of bacteria from culture you started in a previous day and spread over the entire plate using the plate spreader. If you are having difficulty seeing bacteria at the end of the assay add more next time.
-
Let the bacteria dry on the plate before you continue(10 minutes).
-
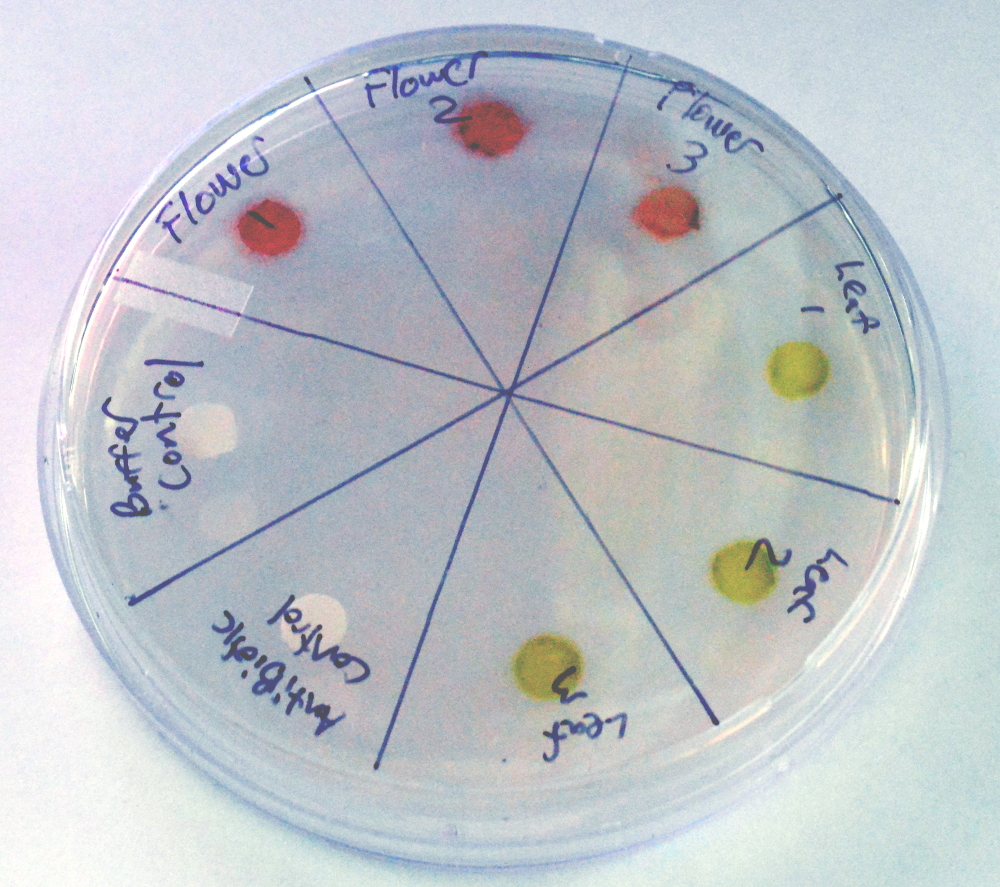
Mark the back of the plate in 8 different sections and label sections with which sample you will put in it. Label one section for your antibacterial control and one section for your buffer control. Do three sections per specimen to allow for reproducibility.
-
Using tweezers take a paper disc and allow it to soak up a drop of each sample. For your control sections put a drop from your buffer tube and antibiotic control tube(Kan) on paper discs and put them in their sections on the plate. Make sure you rinse tweezers after using the antibiotic or it could transfer to other disks and confuse your results.
-
Controls are a very important part of Science experiments. They give us a baseline to compare to to make sure that any variables we have not accounted for are giving us the results we see. The Antibiotic control is considered a positive control and it used to compare the plant extracts to so you can determine how well or not well the extract is working. The buffer control is a negative control, meaning you should see no effect. if there is an effect it could mean your buffer is contaminated, retest it and if there is still a problem switch to distilled water.
-
Take a picture of your plate and then take a picture after 12 hours and 18 hours(times do not need to be exact).
-
Bacterial growth will be visible on the plate and make the plate look cloudy. A clear ring should form around your antibiotic control and your buffer control should have no effect. If your sample has antibacterial properties you should also see a clear ring around the paper disc like you see in the antibiotic control in the picture below. Whether the effect is positive or negative it can contribute to Science so please document your experiment online by using one of the experiments already posted as a template.
Part 2. Testing Bacteria, Yeast, Fungus and Other Micro-organisms
-
Collect your Sample. Bacteria and Fungus can be found most any place. Identify some places you would like to collect from such as your arm, your cat, the floor, or a leaf outside. Label your LB Agar plates with your locations. Next, take a sterile swab and moisten it with water. Use this swab to swab your different locations. After each site, use the swab to inoculate your plates by gentle dragging the swab across the plate.
-
Overnight, you should see some spots on the plates that are bacterial growth, but some bacteria and fungi take longer to grow so keep the plate for a few days. Make sure you take pictures of the plate and which bacteria or fungus you choose.
Bacteria Fungus
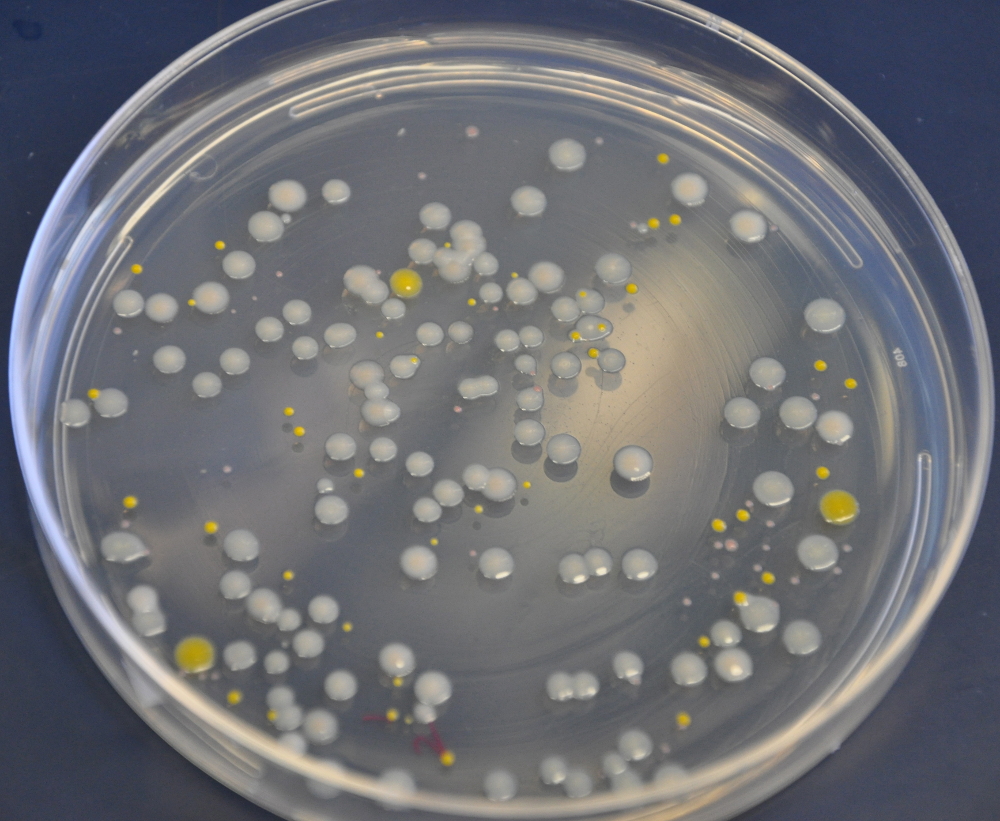

The way to tell the difference between bacteria and fungus is that bacteria usually are single color circular dots, while fungus are “furry”, irregular shaped and can be multiple colors. Yeast will look creamy white and similar to bacteria.
-
Once you have plate growth from Step 2 you should proceed to step 4
-
To test the samples for antimicrobial activity, you will need to start cultures of E. coli bacteria to test against. Screw on the lid and give the tube a shake until the powder is dissolved. Let the tube sit in a warm place with cap slightly unscrewed, to allow oxygen in, for 24-48 hours or until solution starts to become cloudy. The bacteria is non-pathogenic, meaning it cannot cause any disease and is similar to bacteria on your body and can be cleaned up with soap and washed down the drain.
-
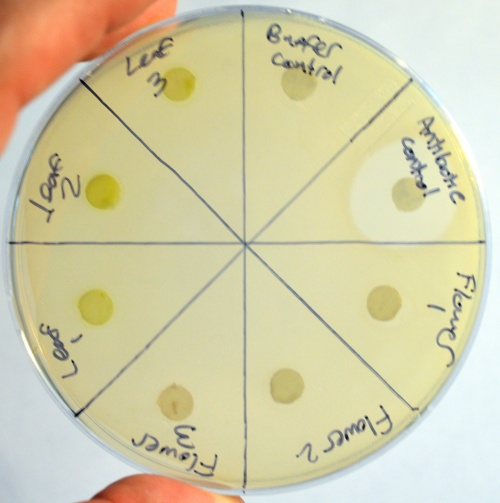
On your sample plates you should see colonies(round spots) of bacteria and perhaps yeast or fungus. Identify some unique and isolated spots, where the individual spots of growth are not touching any neighboring spots. Using a marker, make a circle under each spot that you want to sample and give it a number.
-
Take a new agar plate that will be the testing plate and mark the back of the plate in 8 different sections. Label one section for your antibacterial control. Do three sections per specimen to allow for reproducibility. Make sure to label the sections with the number you gave the sample as you circled it on the sample plate.
-
Take a few drops of E. coli from the culture you started in a previous day and spread over an entire testing plate using the plate spreader and let dry.
-
After the E. coli you put on the plate is dry (5-10 minutes), make your control section by dipping the paper disc in antibiotic control tube and placing it in the appropriate section on the plates.
-
Pick a single spot of bacteria or yeast or fungus to transfer. You will be using a clean inoculation loop for each transfer(inoculation loops can be washed and reused). Fungus samples are often hard to transfer and you may need to move the inoculating loop back and forth on the surface of the fungal colony to get some of the fungal cells onto the inoculating loop. Touch or rub the rounded end of the inoculation loop into the spot of growth, Then touch the inoculating loop to the corresponding sections on the testing plate you just prepared.
-
Take a picture of your plate and then take a picture after 12 hours and 18 hours(times do not need to be exact). This is just for documentation of your experiments.
-
Bacterial growth will be visible on the plate and make the plate look cloudy. A clear ring should form around your antibiotic control. If your sample has antibacterial properties you should also see a clear ring around the growing colony.