
Engineer Your Own Bioluminescent Bacteria

Introduction:
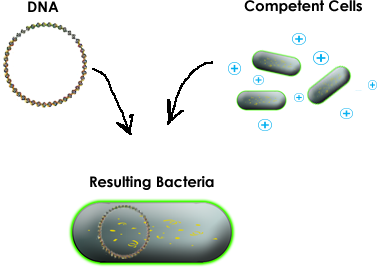
Genetic engineering involves modifying an organism’s DNA to deliberately change an aspect of the organism for a particular purpose. This kit demonstrates the power of the DNA transformation to give an organism access to new DNA on a plasmid(a plasmid is a small circular piece of DNA not associated with the host cell’s chromosomes)
This kit requires ~10 hours of work over the course of at least 2 days. It can be completed in a weekend if fresh bacterial cultures are prepared on a Friday night.
This document is constantly being updated with tips and pointers and there are video links embedded, you can find the most up to date version online at: http://the-odin.com/tutorials/
One can also find more detailed protocols and tutorials here at https://goo.gl/dvwxZZ to learn to pipette or make plates, which are both key to doing this experiment.
What is Bioluminescence?
Bacteria and all organisms need to make proteins to survive. Proteins are tiny nanomachines that do everything from control our metabolism to keeping our heart beating, even make light! In order to make a protein, a cell uses the DNA code. Each 3 letters of DNA codes for a single amino acid and proteins are just chains of amino acids.
Bacterial bioluminescence is created by bacterial luciferase, a protein that cause a chemical reaction to take place with a Flavin MonoNucleotide (FMN) molecule. When this chemical reaction happens light is created. Even if your transformation doesn’t work we included a strain of E. coli on a plate that already has the pJE202 plasmid DNA which gives it bioluminescence.

Kit contents(pg. 4)
Timeline(pg. 5/6)
Making Plates(pg. 7/8/9)
Making Competent Bacteria(pg. 10/11/12)
DNA Transformation & CRISPR(pg.13/14)
Successful experiment example(pg. 15)
Functional Applications(pg. 16)

1 - LB Amp Agar 40g/L Concentration(15mL tube to mix with 150mL water)
1 - LB Agar 40g/L Concentration(15mL tube to mix with 150mL water)
8 - Tubes LB Amp Broth 23 g/L Concentration (15mL tube to mix with 200mL water)
1 - 250 mL glass bottle for pouring plates (fill with 150mL water)
5 - 1mL Syringes ( 100uL = 1/10 mL )
1 - 5 blunt end tips
14 - Petri Plates
1 - Microcentrifuge tube rack
5 - Inoculation Loops / Plate spreader / Pairs of Nitrile Gloves in plastic bag
25~ - microcentrifuge tubes
6 - 1.5mL microcentrifuge tubes containing LB
50mL centrifuge tube for measuring liquid volume
1 - 1.5 mL w/ bacterial transformation buffer 25mM CaCl2, 10% PEG 3550, 5% DMSO
Perishables
E. coli BL21/DH10B/DH5⍺ strain(non-pathogenic)
pJE202 plasmid Ampicillin Resistant enough for 5 reactions
Bacterial Strain transformed with pJE202 plasmid

Preparation
-
1 hour Make plates (set aside more time if it's your first time making plates)
-
streak out bacteria onto an LB Agar plate (takes ~1 min)
-
12-18 hoursLet the bacteria grow (easiest to just let it sit overnight)

Day of experiment
-
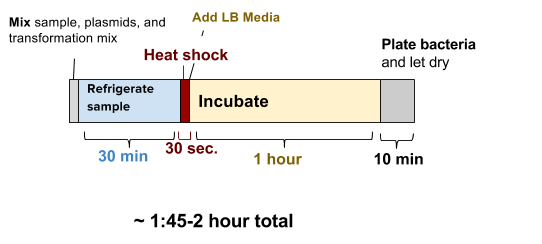
Mix together sample, plasmids, and transformation mix (takes ~5 min)
-
30 min refrigerate sample solution (do NOT freeze)
-
30 seconds‘heat shock’ the sample in warm (42ºC/108ºF) water. Add LB media to your cell solution (takes ~1 min)1 hourincubate for 1 hour, (or if @ room temp, incubate for 3 hour)10 min Plate 100uL of the bacterial solution and let dry for 10 minutes

Incubate and wait for growth
-
~24 hours Incubate the plate at 37ºC (99ºF) for 12-16 hours or room temperature for 16-24
hours.


Making Plates (~1 hour, maybe more time if it’s your first time)
Step by step walk-through with photos at:https://goo.gl/7yzpA1
Agar plates provide a solid media nutrient source for bacteria and yeast to grow on. The standard media that is used is LB (Luria Broth, Lysogeny Broth, or Luria Bertani Broth). This contains a carbon source, a nitrogen source, and salt (many strains of bacteria like salt!).
*The top part of the full plate has the larger diameter.


Making Plates
-
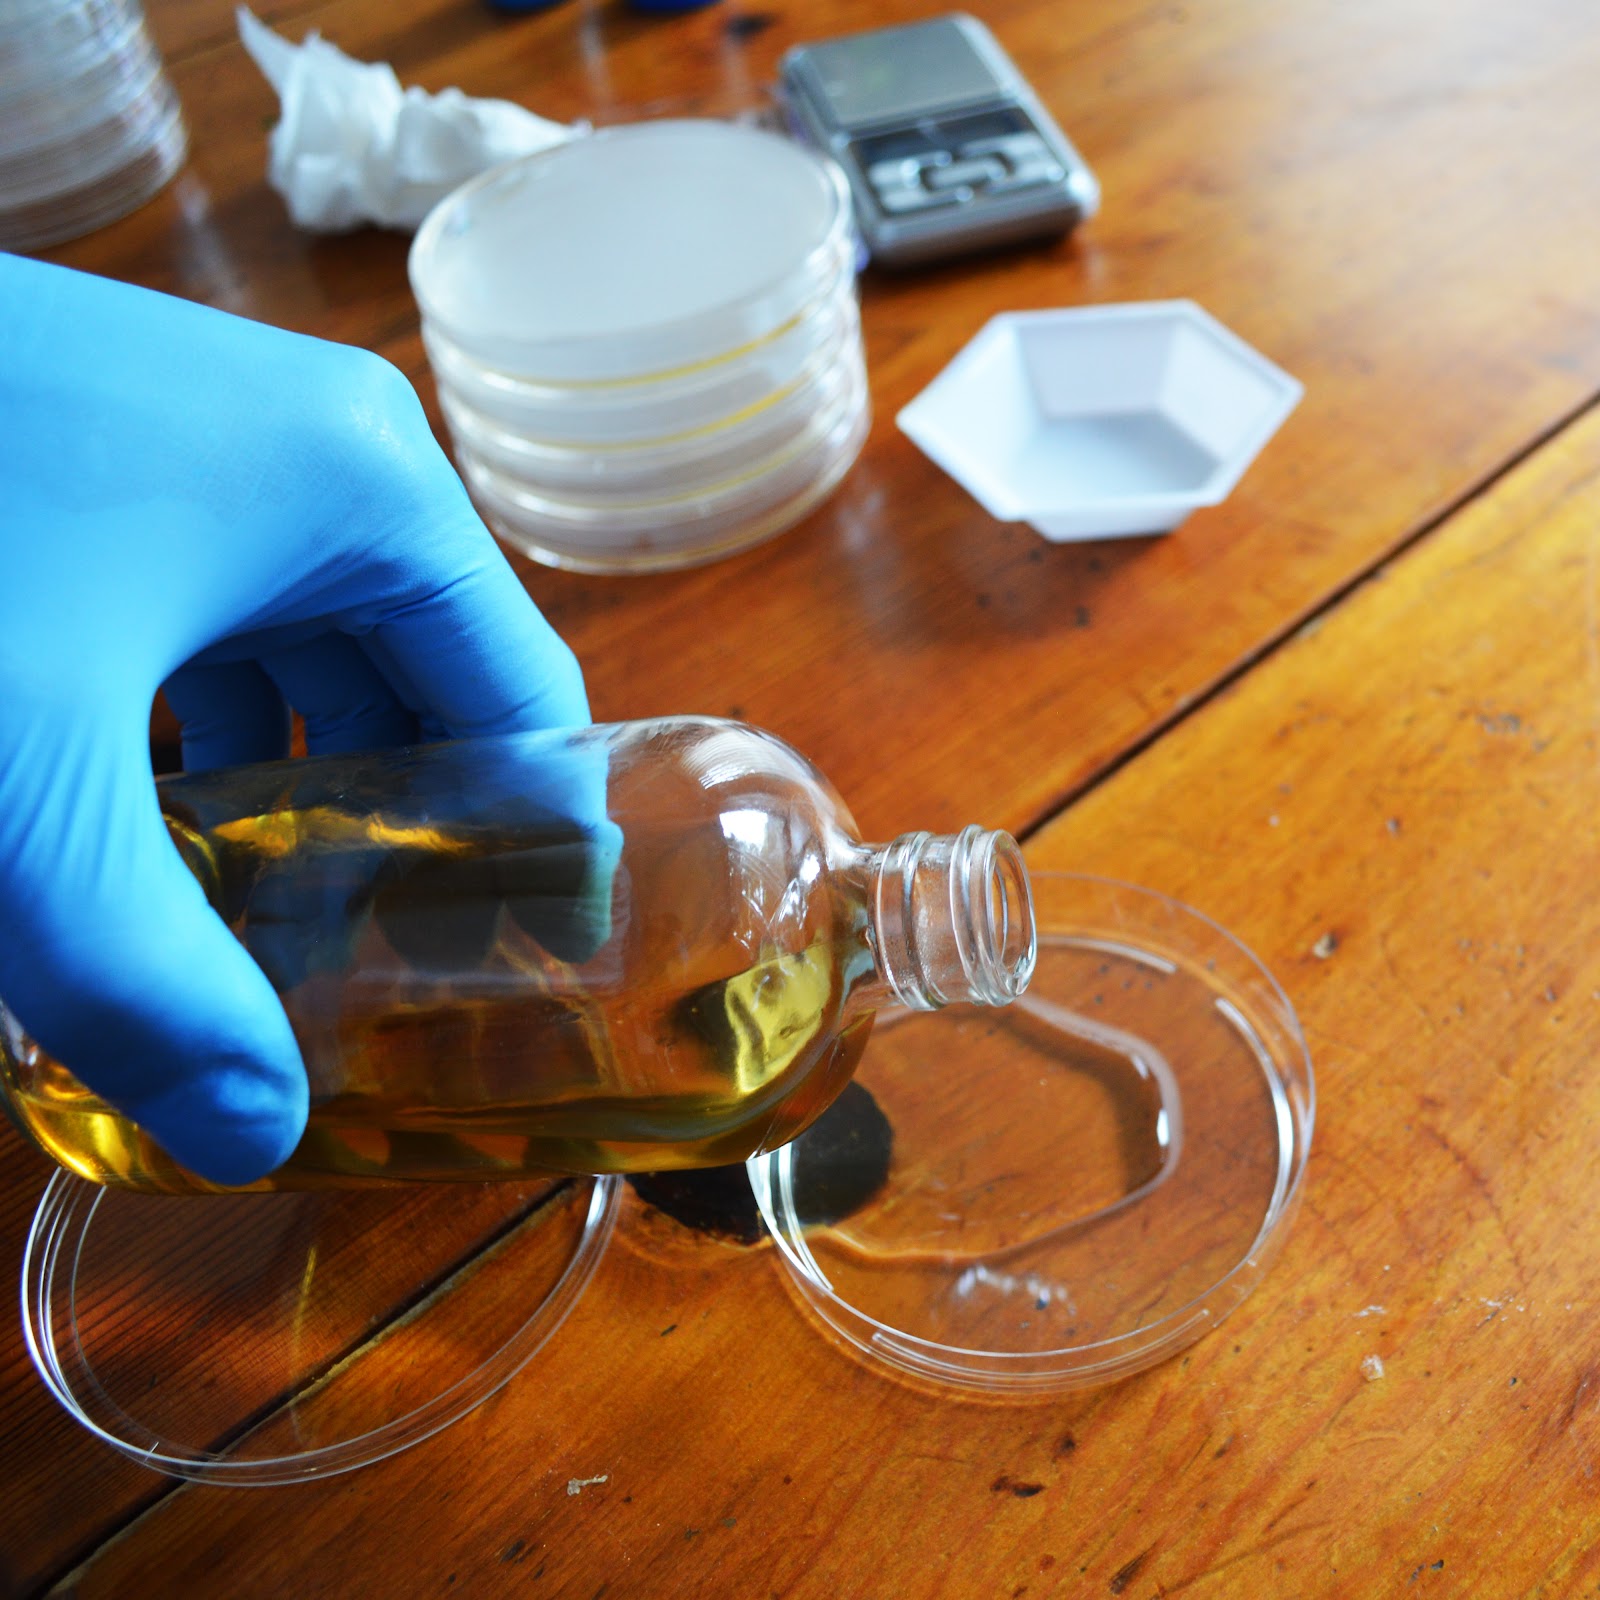
Take a tube labelled Agar media, such as LB Ampicillin Agar(For final growth test) or LB Agar for restreaking untransformed bacteria and dump its contents into the 250mL glass bottle.
-
Using the 50mL conical tube labelled “For Measuring Liquid Volumes”, measure and add 150mL of water to the glass bottle.
-
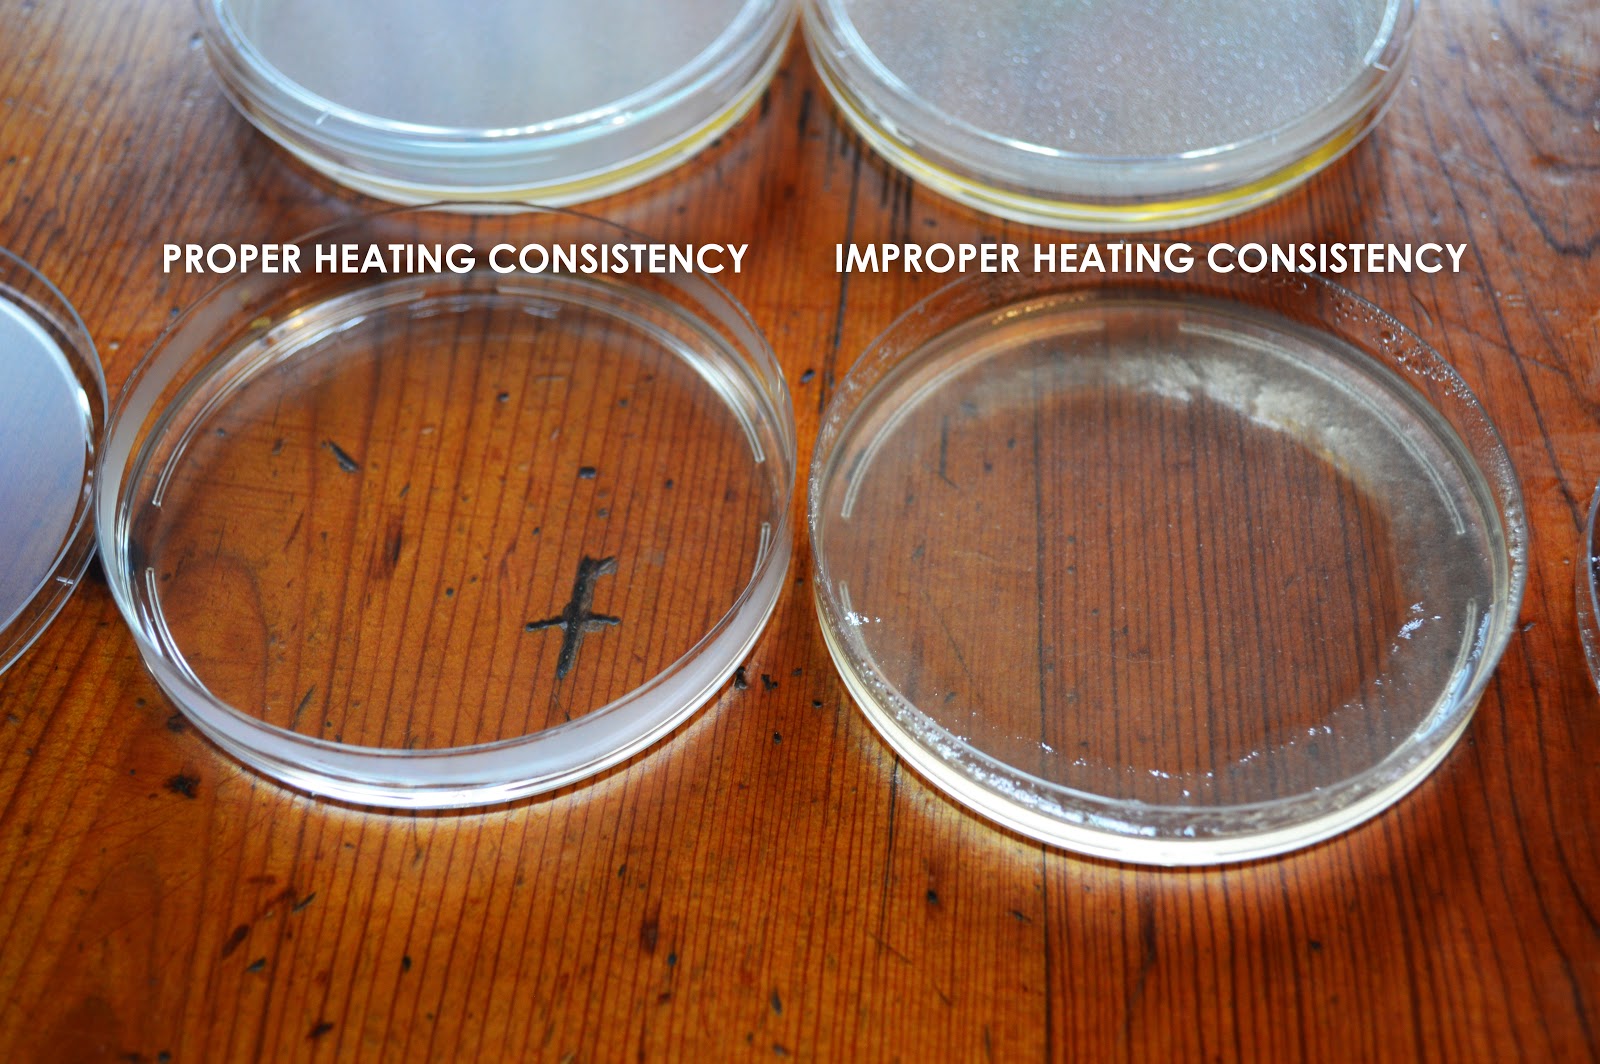
Making agar is like making jello-- heat the agar to dissolve it, then it will solidify when it cools. Heat the bottle in the microwave for 30 seconds at a time, being careful not to let the bottle boil over. DO NOT SCREW THE LID DOWN TIGHT! (just place it on top and give it a slight turn)
-
You will know it’s done when the liquid looks yellow and mostly see-through. This should take about 2 -3 minutes total of microwaving. Take the bottle out(caution contents hot) and let it cool until you are able to touch it without much discomfort. This will take 20-30 minutes but keep an eye on it giving it a swirl every once in awhile to make sure it hasn't solidified.
-
While the bottle remains somewhat warm, pour the plates. One hand holds the bottle the other removes and replaces the top on the plates. Be careful when moving plates to prevent the agar from splashing to the lid or over the sides. One at a time, remove the lid of and gently pour just enough of the LB agar from the bottle to cover the bottom of the plate and put the top back on the plate.

Making Plates
-
Let cool for at least one 1 hour before use(you can cool faster by putting them in the fridge but don’t freeze). Plate should be solid. If possible let the plates sit out for a couple hours or overnight to let the condensation evaporate. Then store in your fridge at 4ºC upside down(solid agar media on top and closed) so any condensation doesn’t drip on the plates. Plates can last for up to a month in fridge.
*Be sure to label the plates LB and LB Amp with a permanent marker to avoid confusion*
*Condensation dripping on agar can permit rogue bacteria and yeast to grow.*
*WHEN MAKING ONE SET OF PLATES AFTER ANOTHER BE SURE TO RINSE BOTTLE THOROUGHLY WITH HOT WATER BETWEEN USE.*

Making Competent Bacterial Cells for Transformation
‘Competent’ means the bacteria or yeast cells are able to intake foreign DNA. The cells’ walls normally prevent things from entering in, but we are going to mix the bacteria with chemicals and salts that change this. In order to get the Bioluminescent plasmids to work inside the bacterial cells we need to get all of the components inside the cells! This process is called ‘transformation.’ We put all the materials into synthetic DNA and then trick the bacteria into thinking that our DNA is its own, and so they make the Luciferase protein,and can perform the chemical reaction releasing a photon and creating light.
The bacterial transformation mix contains:
10% Polyethylene Glycol(PEG) 3350
PEG 3350 is thought to play several different roles in transformation, though nobody really knows for certain. Since both DNA and cell walls are negatively charged, they reject each other. PEG 3350 is thought to function by shielding the charge of the DNA, thereby making it easier to permeate the cell wall. PEG 3350 is also thought to help transport the DNA into the cell, as well as make the cell membrane itself more porous.
(CONTINUED)
Making Competent Bacterial Cells for Transformation
5% Dimethyl Sulfoxide (DMSO)
In a transformation it is thought to permeabilize the cell wall. Also, sometimes DNA folds into complex structures that make it more difficult to pass through the cell wall. DMSO also might help to break these structures down.
25mM Calcium Chloride(CaCl2)
Similarly to PEG 3350, CaCl2 is thought to shield and neutralize the negative charge of DNA, thereby making it more likely to enter into the cell.
-
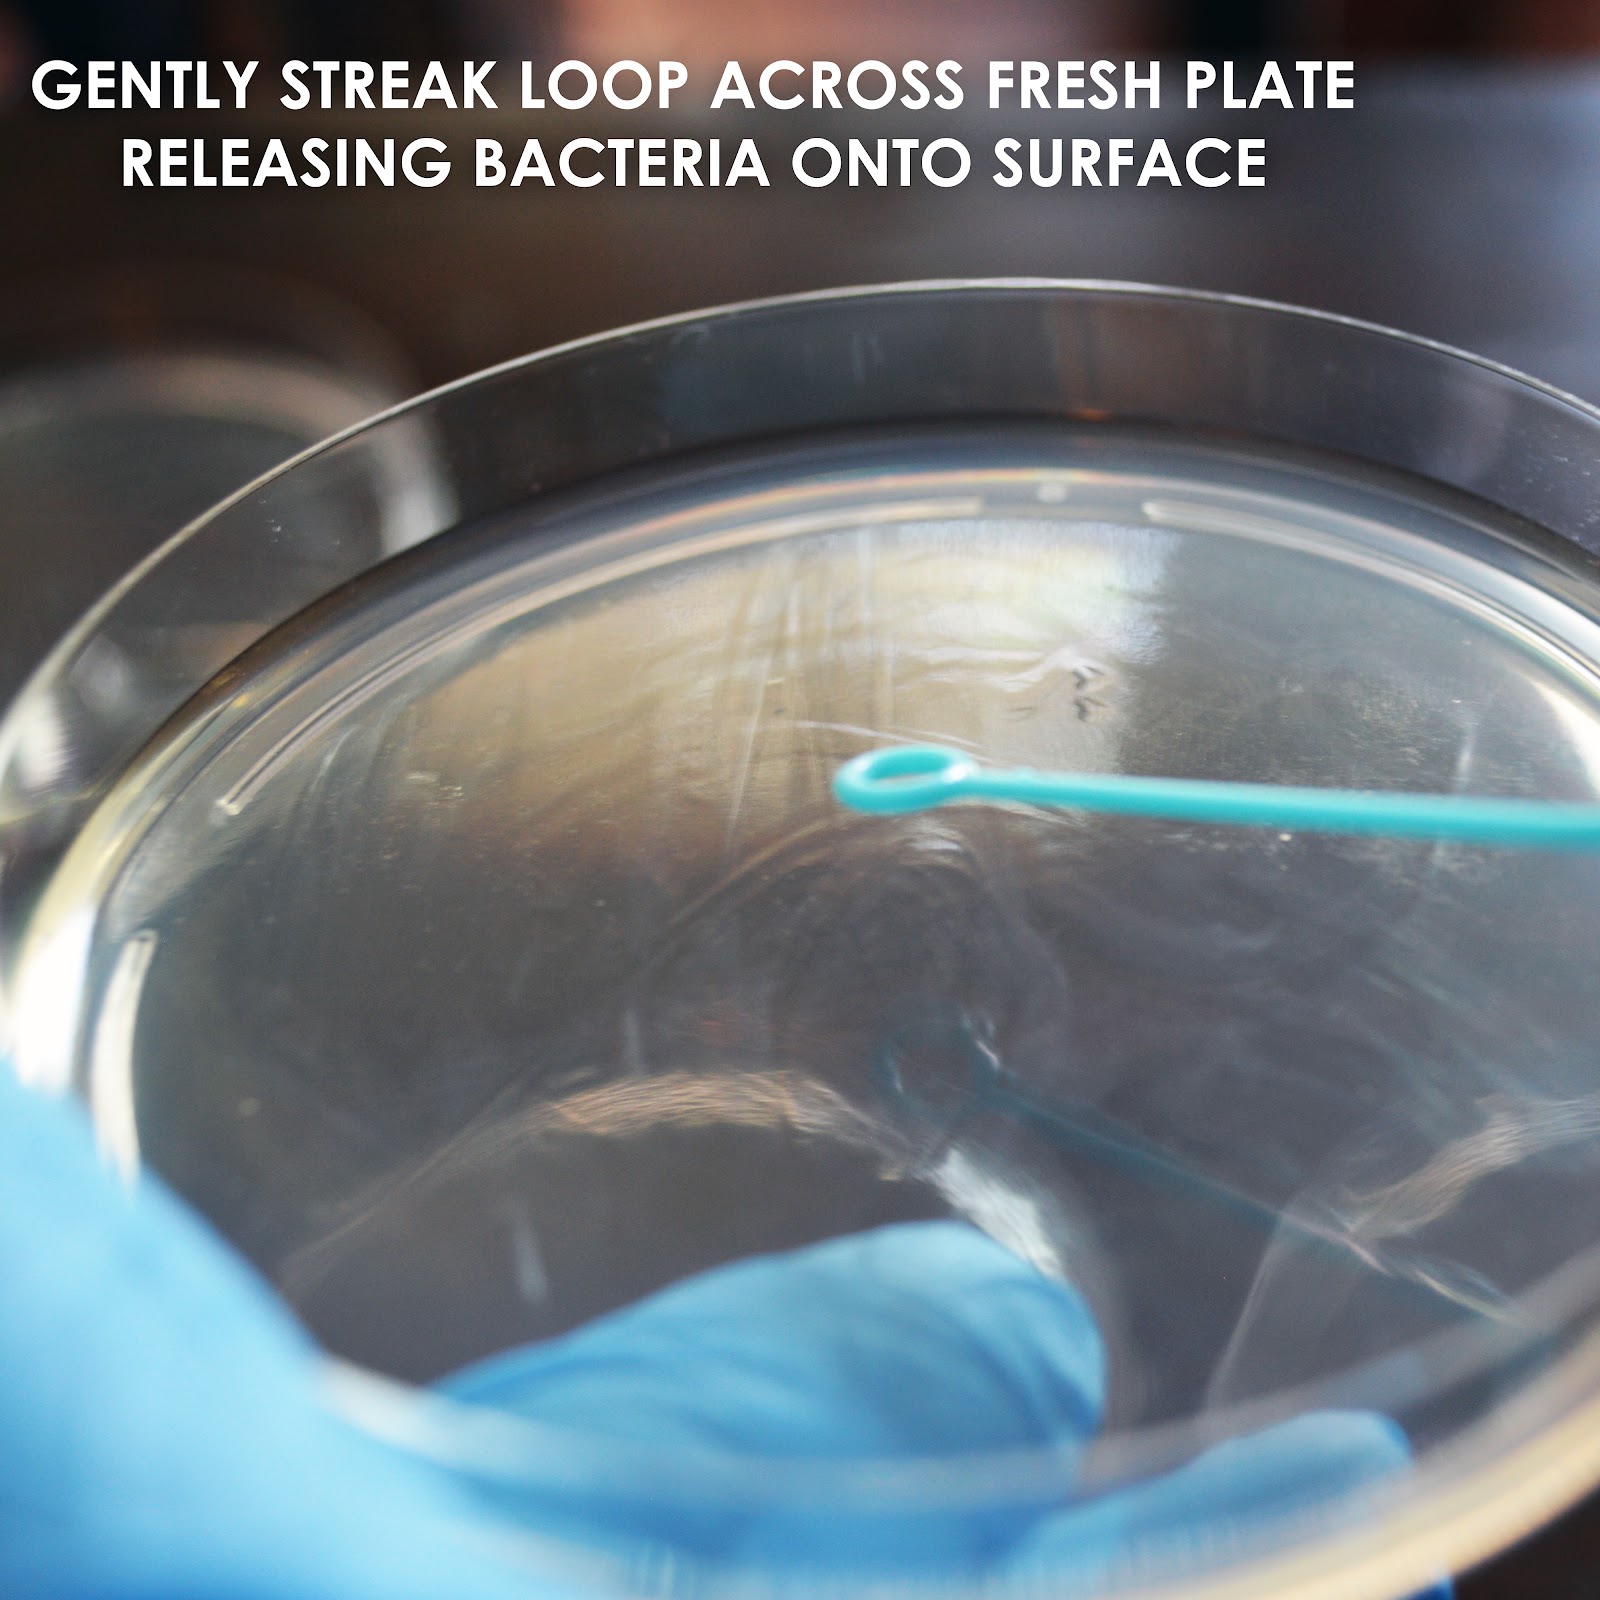
If you received a plate of bacteria use an inoculation loop and scrape bacteria from this plate and gently streak it onto a new plate. Take one of the tubes of dried E. coli BL21, add water to the top and shake till it is all dissolved. Next, using your pipette put 100uL of the bacteria solution onto a new LB plate you made and using an inoculation loop gently spread or “streak” the bacteria. Let the plate grow overnight ~12-18 hours, or until you see white-ish bacteria begin to grow. Make sure you are using the LB agar plate, NOT the LB Amp agar plate. See the following link for a walk-through of how to streak out bacteria:https://goo.gl/GR8IOf
-
Note: avoid placing the plate in areas of high temperature variation like an unheated garage. Consistent and warm temperature locations are preferable.
-
Having fresh bacteria for a transformation greatly increases the likelihood that your experiment will work.

Making Competent Cells for Transformation(continued)
-
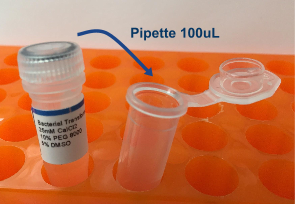
Pipette 100uL of Transformation mix to a new microcentrifuge tube. See the following link to learn to pipette:https://goo.gl/nrA8hT
-
Using an inoculation loop, gently scrape some bacteria off of your fresh plate until it fills the hole of the loop, and mix it into the transformation mix. Mix until any big clumps have disappeared. This might require gently pipetting the mixture up and down. Avoid creating bubbles if possible. Your transformation mix should be very cloudy, if not mix in more bacteria till you cannot easily see through the liquid in the tube. Make one tube for each experiment you plan to perform in the next day or two and store them at 4ºC (39ºF) in the fridge.

-
Find the DNA tube labelled “pJE202 plasmid” and, using your pipette, add 10uL to one tube of your competent cell mixture.
-
Incubate this tube in the fridge (DO NOT FREEZE) for 30 minutes.
-
Incubate the tube for 30 seconds in 42ºC (108ºF) water. You can approximate this temperature by using water that is warm, but comfortable enough such that you can still keep you hand in it.
-
Add 1.5mL(or fill to the top) of room temperature water to one of the LB media microcentrifuge tubes and shake to dissolve the LB.
-
Using the pipette, add 500uL of LB media to your competent cell mixture containing your DNA.
-
Incubate the tube at 37C(99F) for 1 hour or 2 hours at room temperature. This step allows to bacteria to recover and replicate the DNA and perform the engineering process. Take a LB Amp plate out of the fridge and bring to room temperature
-
Using the pipette, add 200uL of LB media to your competent cell mixture onto the LB Amp plate.
-
Using an inoculation loop, gently spread the bacteria around the plate and let dry for 10 minutes before putting the lid back on.
-
Flip the plate upside down to prevent condensation from forming and dripping onto your bacteria.
-
Incubate the plate at below 30ºC (80ºF) for 16-24 hours or room temperature for 24-48 hours.
-
If you begin to see little white round dots growing, then your genetic engineering experiment was a success! You know this because the plasmid inserted has a built in resistance to the amp chemical. If not, give it another shot, Science doesn’t always work on the first try. Also, feel free to contact us at odin@the-odin.com and we will help you troubleshoot.
-
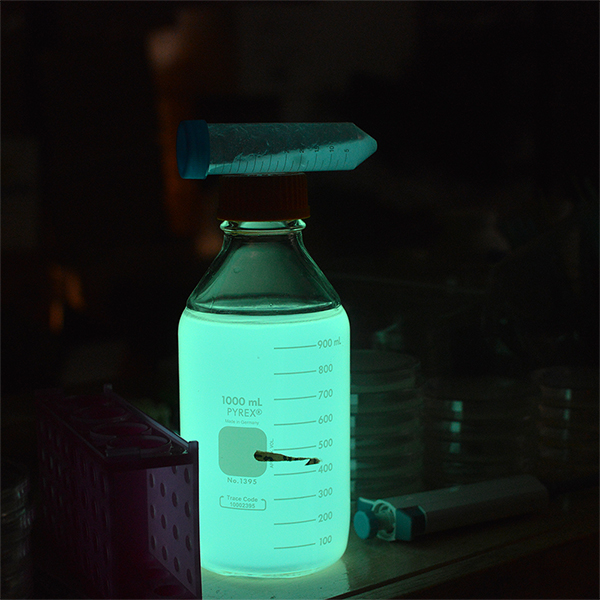
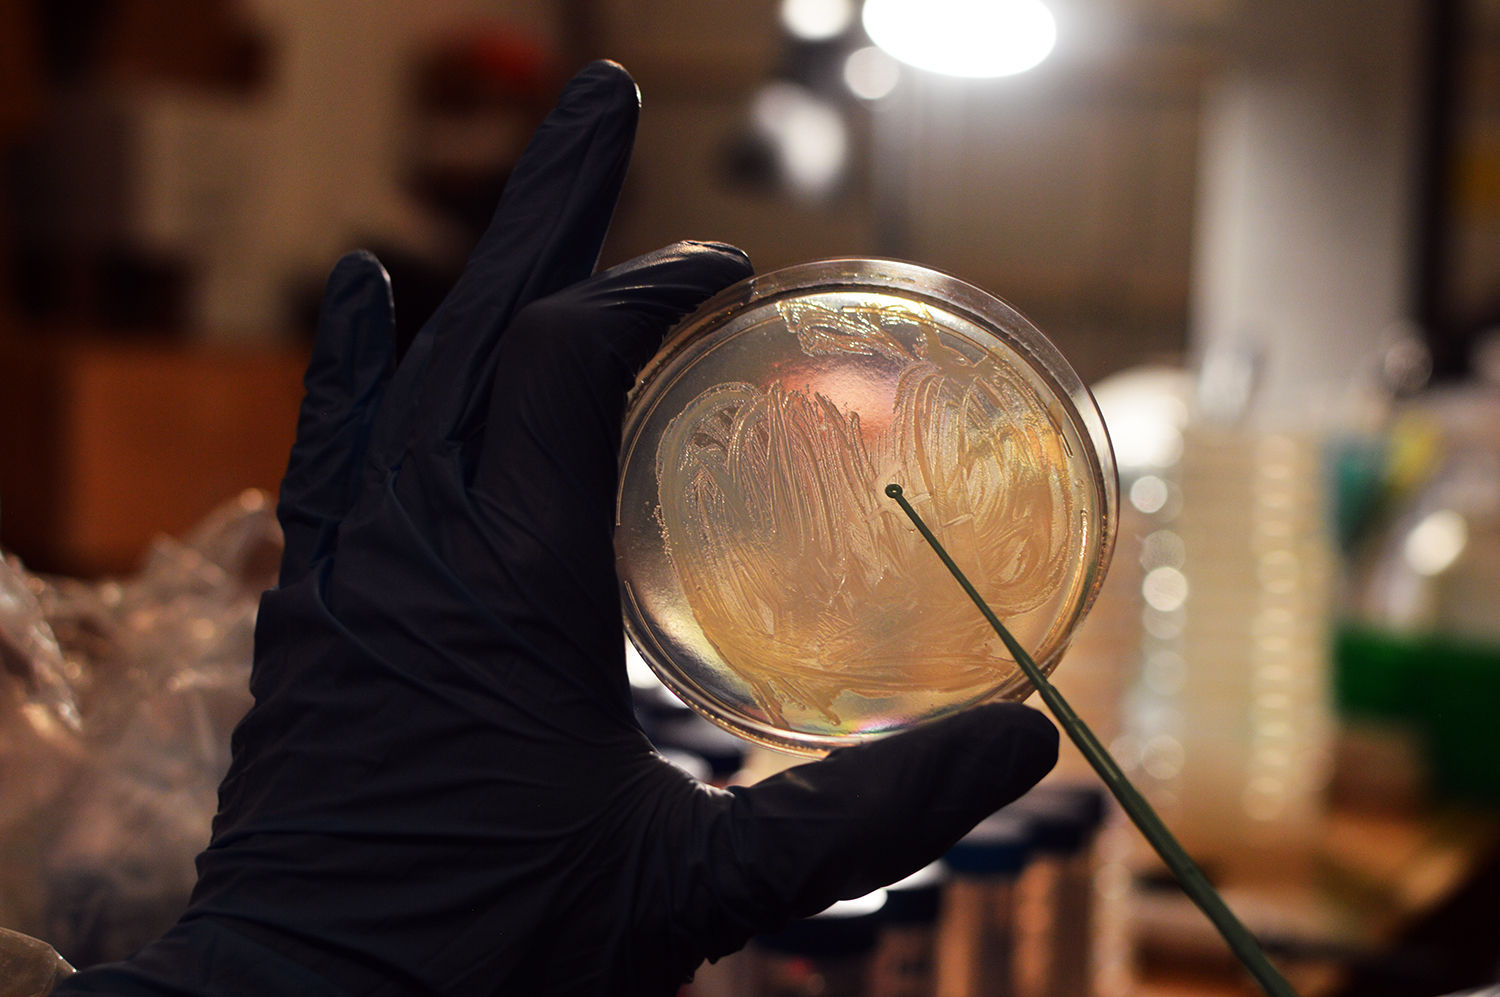
If your transformation was successful you should have a plate that looks like the one below and if you take it into a dark room, you might even be able to see the dots glow!

Successful experiment example...
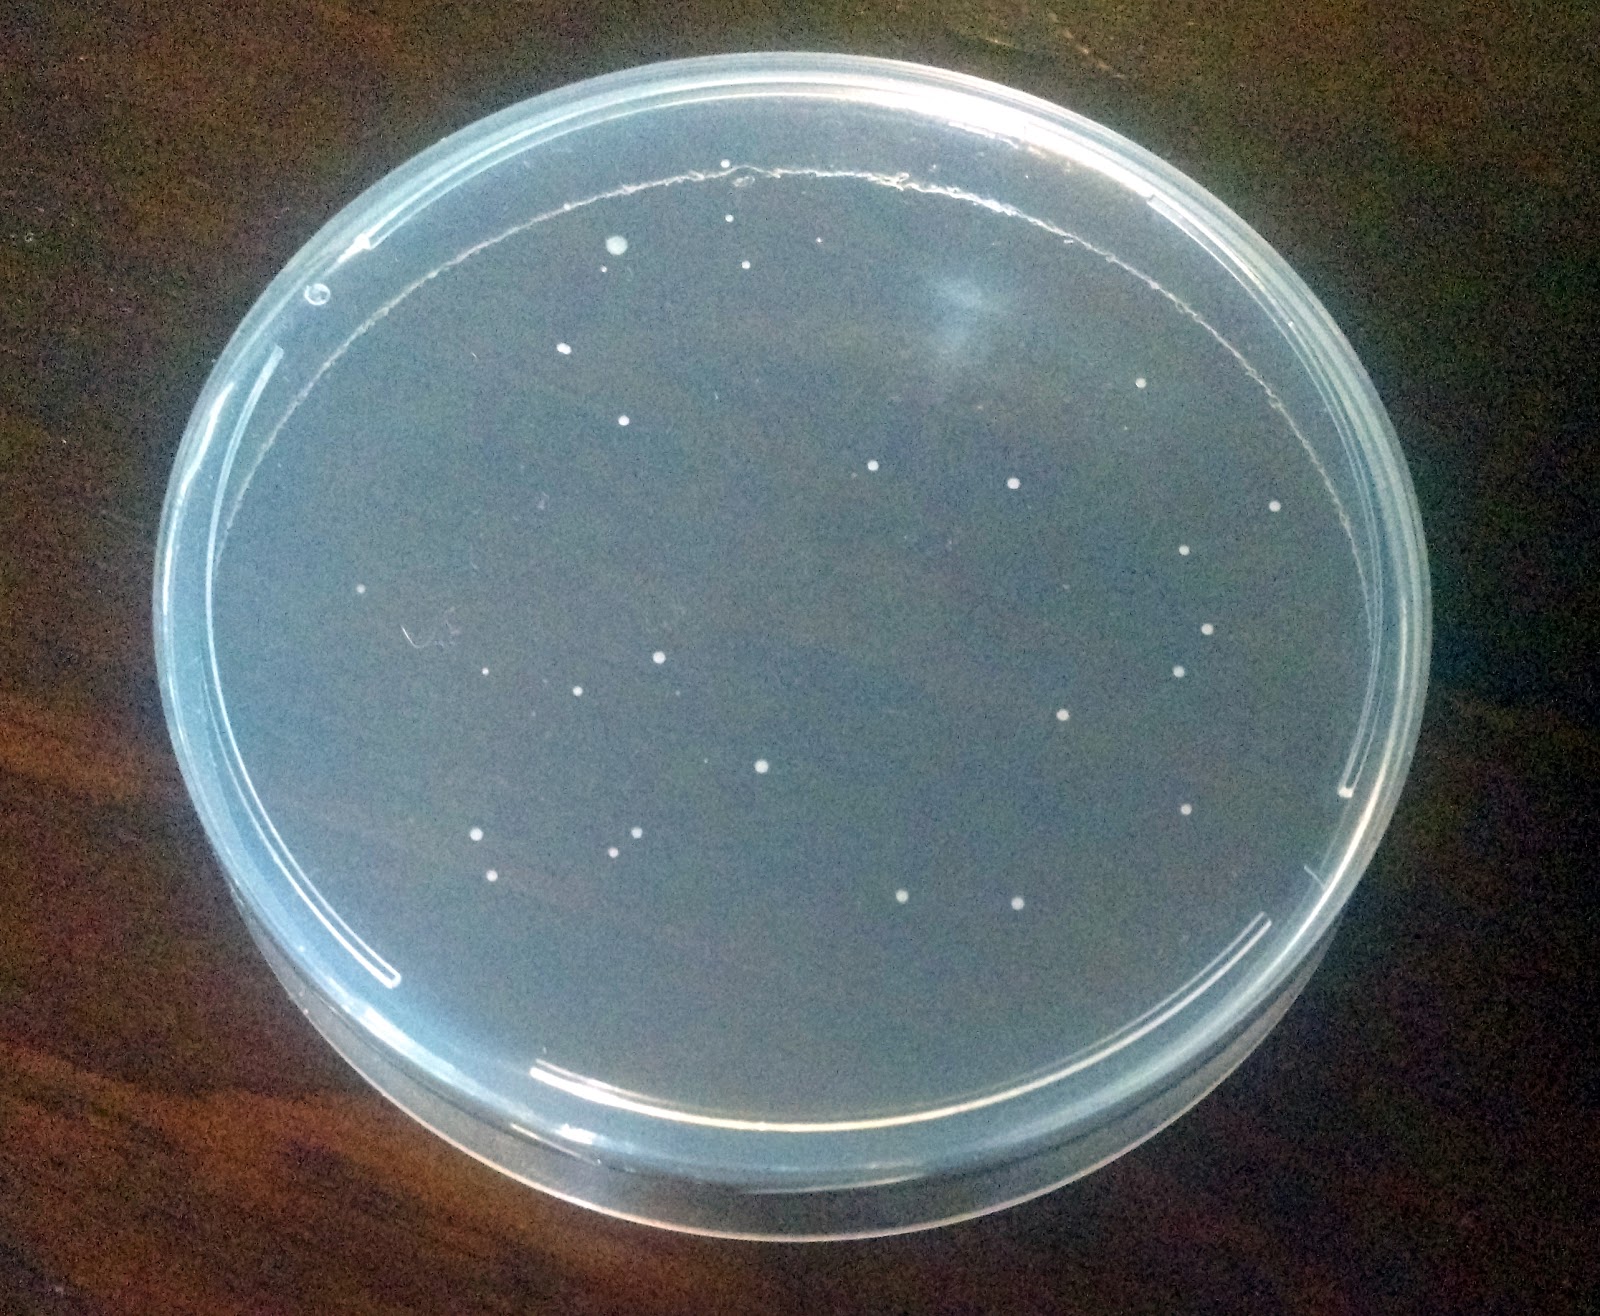
In a successful experiment you should see whitish or yellowish bacteria growing on the plate as seen in the picture. These are bacterial colonies that were successfully edited and so they survived and replicated to form what Scientists call colonies, or small groups of bacteria.
You can scrape one of these colonies to a new plate or suspending broth to create your own glowing
Sustainable friend. If environment is kept from contamination one should be able to re-plate once a month while kept in fridge, or transfer half of the container to fresh broth to maintain a functioning glowing ecosystem

One major problem people have is that they let the bacteria culture temperature rise above ~80F (30C). Don’t let the temperature rise above ~80F (30C)! Keep at room temperature for best results, 65F-75F! If your house is warm, a good way to prevent your bacteria from experience temperature fluctuations is to store the culture in a styrofoam container.
Protocol for liquid culture
Step 1:
-
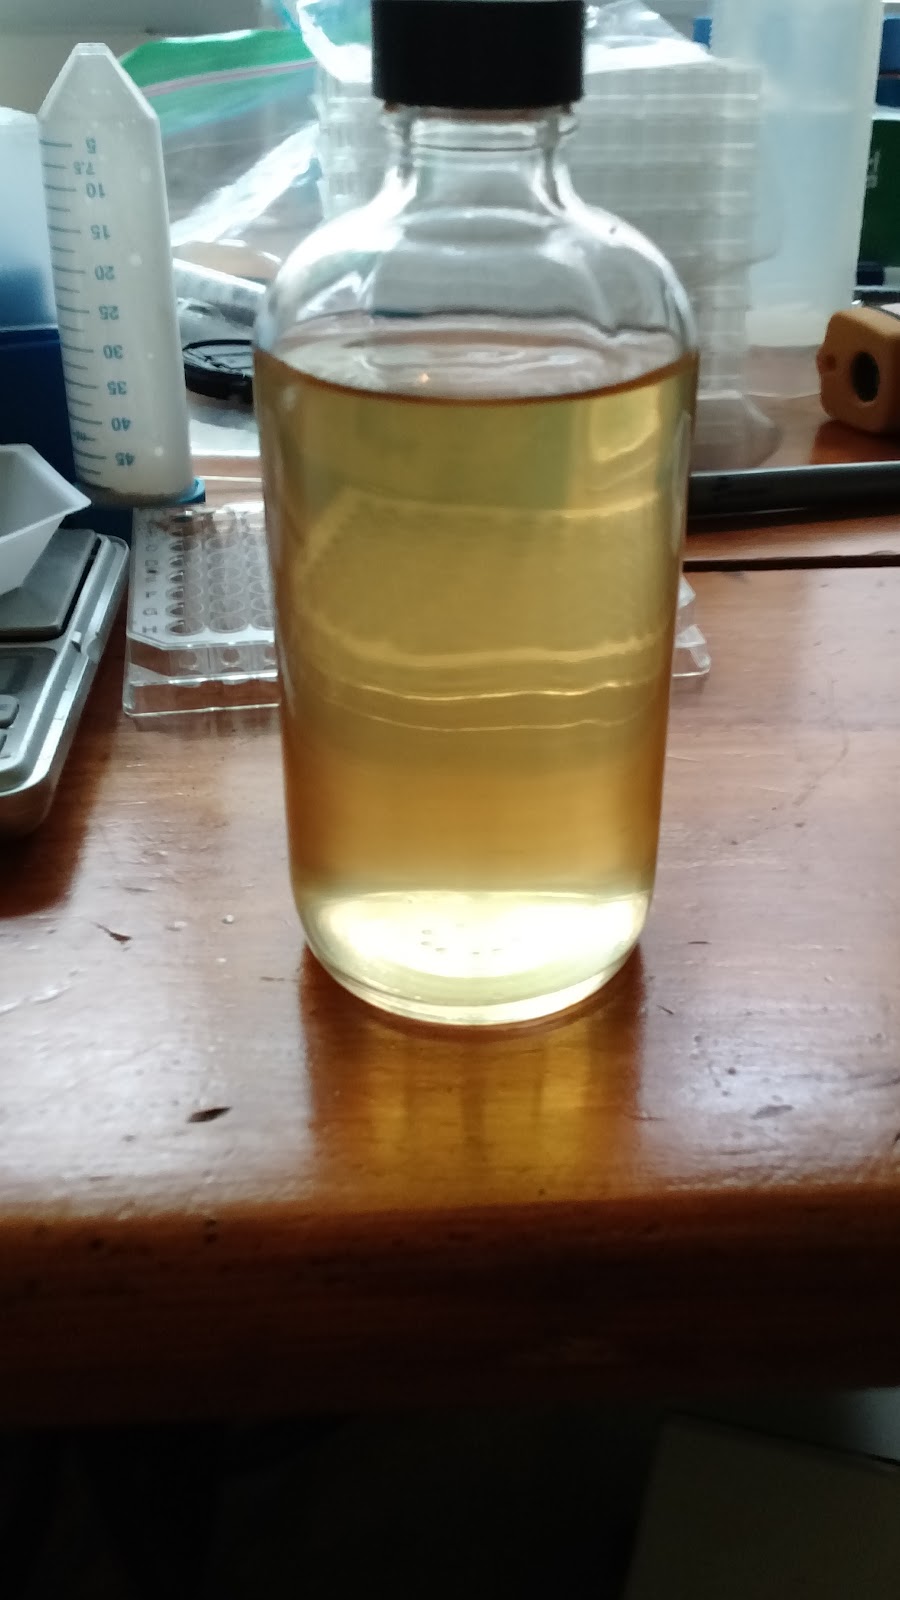
Add contents of one LB Amp media tube to glass bottle
-
Add ~200 mL clean water to the bottle.
-
When all powder is dissolved using an inoculation loop gently scrape a very small amount of bacteria off of the plate(The more you introduce, the faster it will glow) you transformed or already transformed plate and mix it into the bottle. Leave cap halfway on to introduce oxygen. If you don’t see growth after a day you might not have put enough bacteria in the culture.
-
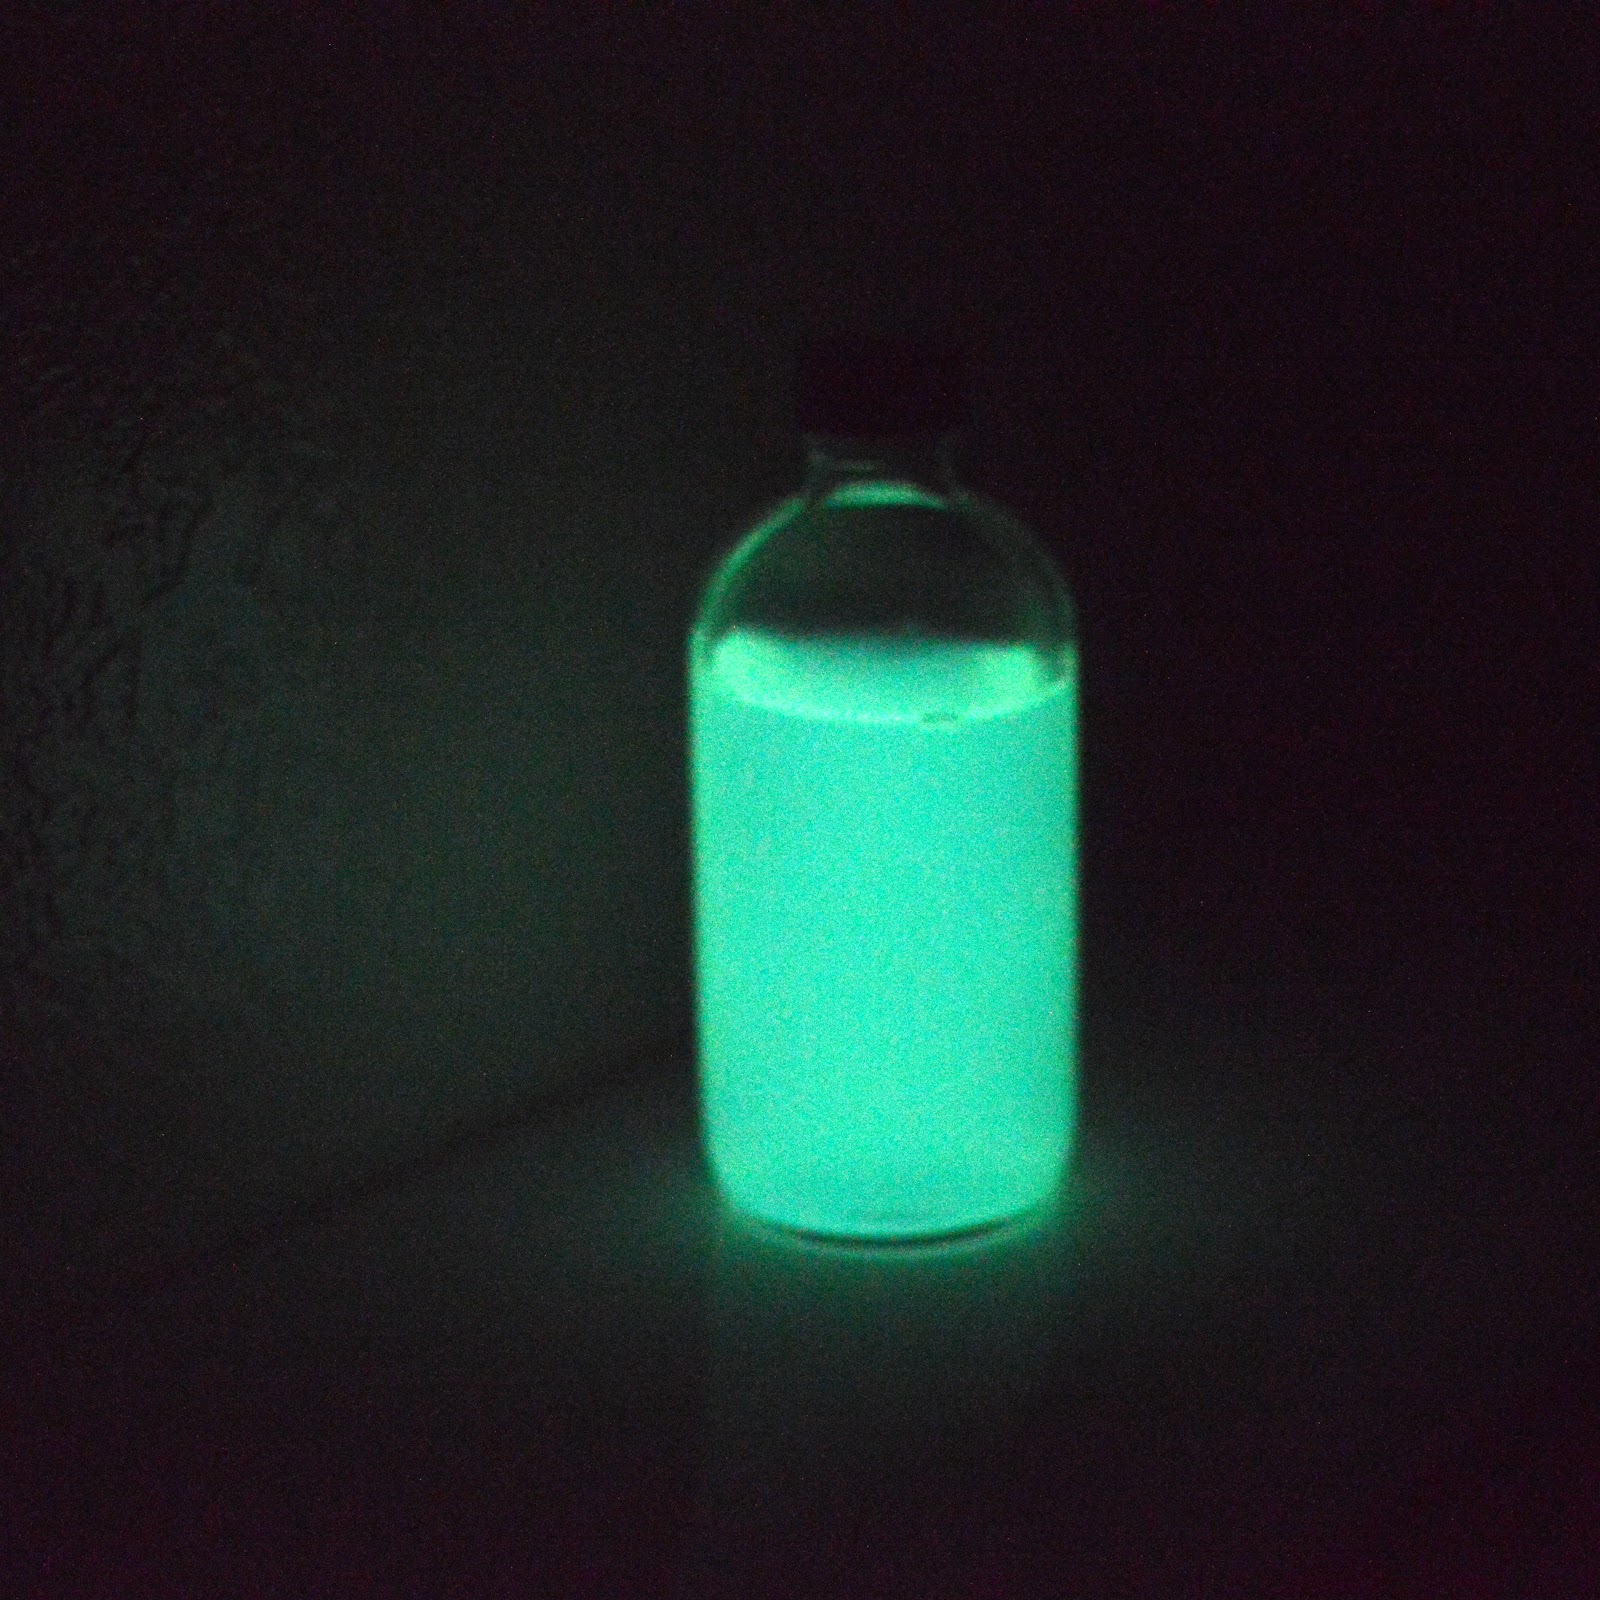
For best effect start the culture in the morning and view at night or let the culture sit overnight and view in the morning(wait ~6-10hrs for 200mL) You will be able to see the glow as the bacteria are growing but the intensity depends on how much bacteria there are. To see glow just give gentle swirl to the bottle.
*Once the bacteria start glowing keep in a cool dark place so the glow lasts a long time*
*Be ruthless in your defense against contamination. Contamination = noglow Aggressively wash hands and bottles and try not to breath onto broth experiment.*
You have been given enough LB Ampicillin Media tubes to grow up 1.6L of bioluminescent bacteria. You can do all at once or keep the same one alive for consecutive days if you dump half out into new broth every 36 hrs. You can even just take a few drops out of the already glowing broth and add it to fresh broth and wait a series of hours for it to reach peak brightness again
The applications are endless and don’t be afraid to email us at odin@the-odin.com if you have questions or need inspiration or to re-up your supplies.
DON’T SHAKE WHILE INCUBATING!
Protocol for plates
-
Using an inoculation loop transfer bacteria to a fresh LB Amp media plate.
-
Keep the plate below 30C(80F) for 4-12 hours or until you see growth.
-
Take the plate into a dark room and you should be able to see glowing bacteria.
-
Once the bacteria start glowing keep in a cool dark place
-
This makes the glow last a long time
-
You can place the plate in your fridge for a few weeks to keep it alive
-
take it out whenever and warm it up a little and it will still glow a bit! Restreak to a new plate to renew the glow.
